
| SpaceClaim Online Help |
|
You can create patterns of:
Patterns can be made from a mix of object types, such as a pattern of holes (faces) and bolts (imported components). You cannot create a pattern of threads. You can use the Undo button, Ctrl+Z or Redo button, Ctrl+Y when creating a pattern.
Click the  Circular tool in the Create group on the Design
 tab.
tab.
Select a protrusion, depression, body, sketch, points, axes, planes, origins, or 3D curves to be the first member (leader) of the pattern. The Direction tool guide activates.
Select a line, edge, axis, sheet metal marker, or a set of points to set the direction of the pattern.
(Optional) Modify the Pattern options in the Options panel.
Pattern Type: One-dimensional or Two-dimensional.
Change Circular Count, or Angle values for One-dimensional.
Change CircularCount, Angle, Linear Count, or Linear Pitch values for Two-dimensional.
Note that a Circular Count of one, in a two dimensional pattern, will create a single radial pattern.
As you switch between pattern types, or change pattern values, the pattern preview displays your changes in blue.
Select the Define Pattern tool guide.
Select the Create Pattern tool guide, or press Enter, to complete the pattern.
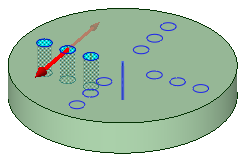
When the pattern is previewed, any members which cannot be created are shown in red. Members that can be created are shown in blue.
The image below shows the preview for a two-dimensional pattern. For one-dimensional, only the Angular direction is displayed. Clicking the arrows flips their direction 180-degrees.

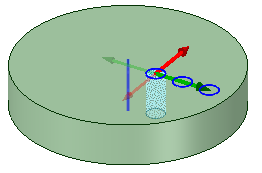
You can create circular patterns on cylindrical faces, both around the face and along the axis.
In SpaceClaim, any pattern member can be used to modify the pattern after you create it. If the change cannot be made to all pattern members, the member that cannot change is still part of the pattern.
When you select a member of a pattern, you will see fields for the pattern count and distances relative to the member you have selected. Press Tab to move among the dimension and count fields.
Icons next to the pattern’s dimensions and counts show which will be changed if you change the value of the highlighted field. The closed lock indicates that a dimension won’t change and the open lock shows you it will change. You can override a lock on a dimension by clicking its icon to toggle it between locked and unlocked.
Dimension or count line placement, arrows, and value fields show you how the pattern will change if you change the value of a field.
Your selection determines how changes to the distance and count affect the pattern’s position. If you select one member of the pattern, the change is centered on that member. If you select all pattern members, the change is centered on the entire pattern, with the distance between members locked by default. You can control which direction the pattern will grow based on which member you select and which count or distance you change.
Changing a pattern count in one direction does not change the distance between pattern members. Instead, the overall distance of the pattern will change. This is indicated by the closed lock icon.
Circular patterns are anchored at the opposite end by default when you move one end.

|
Patterns of sketch entities and 3D curves are no longer patterns when they change into another form, such as a surface or solid. For example, if you pattern a C-shaped curve, then it will remain a pattern when you switch from sketch mode to 3D mode. But if you close off the curve to make a box before you switch to 3D mode, then the boxes will become surfaces and will no longer be a pattern. |
Select all radial pattern members.
Click the Circular pattern tool.
Set the Pattern type to One-dimensional.
Enter the Circular count and Angle.
Click on the circular axis.
To create a single radial pattern, set the Pattern type to Two-dimensional and enter a Circular Count of 1.
Select one pattern member to display the pattern count and dimensions.
Edit the pattern's properties.
Press Tab to switch between the fields.
Click the lock icon to lock or unlock a value.
Press Enter.
The result of editing the count and spacing is relative to the member of the pattern you select.
|
|
To quickly increase or decrease the number of pattern members, press Tab until the count field is highlighted, then hold the Alt key while you press the up or down arrow. |
© Copyright 2014 SpaceClaim Corporation. All rights reserved.
 To move a pattern