|
SpaceClaim Online Help
|

|
Aligned cross section views

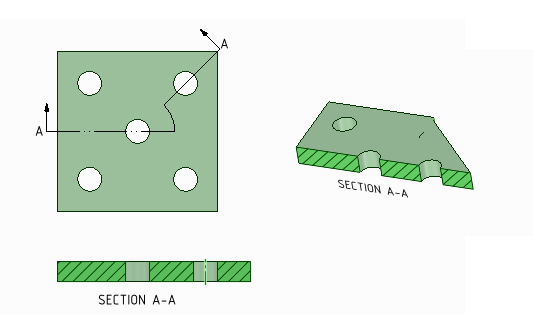
Aligned cross sections are similar to cross sections but the segments are rotated about a pivot point to be parallel to the sheet. So, the width of the section view will be greater than the width of the parent view.
In some cases, you may want to only show the geometry that lies in the section plane. This is called an Area section. In other cases, you may want to see the geometry behind the plane as well. This is called a Total section. Both types are illustrated in the image below.

The section of SpaceClaim Options also has settings for Cross Sections. Refer to the Options and Style Options.
Planar cross section views can be created in the following ways:
- As a new view projected from an existing view.
- By converting an existing view to a cross section.
Once a cross section view is created, you can reverse the viewing direction.
- Right-click on a section line or arrow.
- Select Flip Viewing Direction.
You can modify an aligned section by selecting and dragging individual section line segments, the segment you are dragging will snap to and merge with other sections.
Segments can be deleted. If all segments are deleted, the section reverts to Planar.
To create an aligned section with a single pivot point
- Create a cross section view and exit the tool.
- Select the Cross tool.
- Click the Set Pivot for Aligned Sections tool guide.
- Click somewhere on the section line to set the pivot point.
- The Create Aligned tool guide activates.
- Click somewhere on the section line to set a cutter point.
- Drag to move that portion of the section line.
- An arc is created to show how the linear sections connect. The arc has no length in the section view.
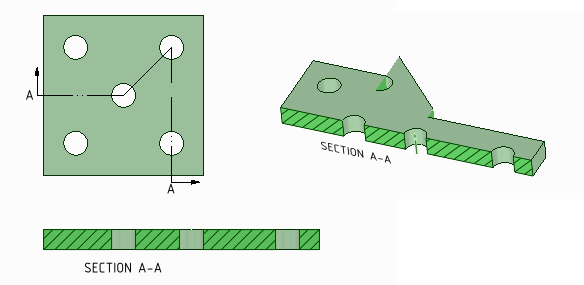
To create an aligned section with multiple cutter points
- Create a cross section view and exit the tool.
- Select the Cross tool.
- Click the Create Aligned Sections tool guide.
- Click somewhere on the section line to set the pivot point, which also sets the cutter point.
- Drag to move that portion of the section line.
- Repeat to set additional cutter points.
To add aligned section pieces to an existing cross section
- Right click on a section line.
- Select Aligned .
- Click somewhere on the section line to set the pivot point, which also sets the cutter point.
- The tool creates a default pivot.
- Drag to move that portion of the section line.
- Repeat to set additional points.
-
Right-click the cross-section view on the drawing sheet or in the .
-
Select Publish to 3D from the context menu.
A published section appears as a root node in the .
You can right-click the published cross-section in a and select with . You can also use the tool to move a published cross-section.
© Copyright 2015 SpaceClaim Corporation. All rights reserved.
 cross sections but the segments are rotated about a pivot point to be parallel to the sheet. So, the width of the section view will be greater than the width of the parent view.
 To publish a cross-section view to 3D