|
SpaceClaim Online Help
|

|
Mesh cleanup
3D Printing requires that the mesh be watertight and free of self-intersecting facets, or other defects. The Cleanup tools identify and fix mesh defects.
Checking meshes
Use the Check Mesh tool to list problems with the Mesh that will adversely affect the 3D Printing process.
Problems detected include the following:
- Multiple pieces (i.e mesh regions or shells)
- Non-watertight mesh
- Self intersections
- Over-connected (i.e non-manifold) edges
To check a mesh:
- Select a mesh in the
- Click the Check Mesh tool
- A dialog appears listing any issues found
The Check Mesh tool can also be used in an Action- workflow by entering the tool and then selecting the mesh.
Automatically fixing a mesh
Use the Auto Fix tool to automatically search for, and fix any mesh defects.
The Auto Fix tool performs the following sequence:
- Fix self-intersections
- Close holes using the methods described the find and fix example below.
- If there is surrounding curvature, the hole is closed using the Patch method.
- If the surrounding edges are approximately planar, the hole is closed using the Cap method.
- Recheck for self-intersections
- Fix self-intersections
- Remove void shells
- Fix inverted normals
- Fix non-manifold edges and vertices

|
Additive Manufacturing technology is capable of producing interior voids (enclosed, hollow spaces) that would not be possible with traditional manufacturing methods. Depending on the additive process used, the void may contain unused resin, powder, or support materials. If voids need to be in the finished part, it is good practice to build it in halves or add access holes to remove the unused materials. |
To Auto Fix a mesh:
- Click the Auto Fix tool
- Select a mesh in the Graphics window
- Problem areas are fixed
Mesh intersections
Use the Intersections tool to highlight areas of self-intersection.
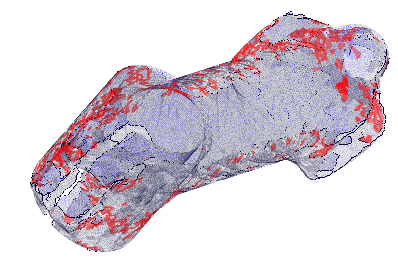
To check for intersections:
- Click the Intersections tool
- Select a mesh in the Graphics window
- Areas of self-intersection are highlighted
- The model is also made transparent if any intersections are found
- Click Complete to fix the intersections
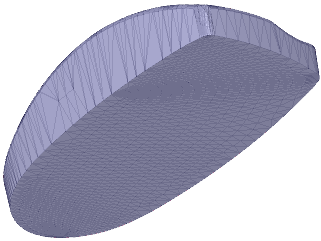
Holes in meshes
You can find and fix holes using the Holes tool. It works like other Find-and-Fix tools in the Repair tab.
In the mouse example below, the button needs a smooth fill and the bottom simply needs to be capped.
To find and fix holes in meshes:
- Click the Holes tool to highlight holes in the mesh.
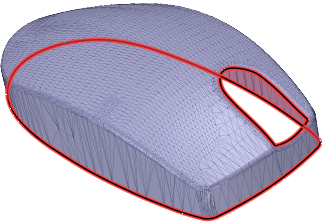
- Click the Exclude Problem tool guide.
- Select the bottom hole because it needs to be flat and the button needs to be smooth.
If there are more than one holes to exclude, you can use box-selection.
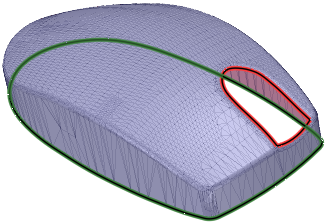
- Choose the Patch option.
- Click the Complete tool guide.
- The button is filled in smoothly and the bottom hole is highlighted again.

- Click the Cap option.
- Click the Complete tool guide to cap the bottom
Mesh sharps
Meshes may contain sharp spikes that need to be flattened. You can use the Fix Sharps tool to find and fix any sharps in the mesh. It works like other Find-and-Fix tools in the Repair tab.
There are several options to control how sharps are fixed.
- Sharp edges: This applies to the angle between normals of facets that share an edge. Any edges with an edge angle greater than the specified angle will be found.
- Sharp vertices: This applies to the angle between normals of any two facets that share a vertex. Any vertices with an angle greater than the specified angle will be found.
- Convexity options specify which type of sharps to look for.
- Both convex and concave: All types are found.
- Convex: Only convex sharps are found. These are sharps that point outward.
- Concave: Only concave sharps are found. These are sharps that point inward.
To find and fix sharps:
- Click the Sharps tool.
- Based on the options settings, if any sharps are found, they are highlighted.
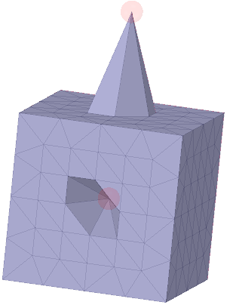
Convex and concave sharps are found.
- (Optional) Change the option settings as needed.
- Use the Select Problem tool guide to select and fix individual sharps.
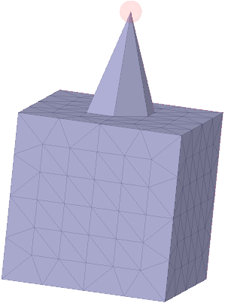
The concave sharp is flattened.
- Use the Exclude Problem to exclude problem areas.
- Use the Select Geometry tool guide to select areas not found automatically by the tool.
- Click Complete to fix all remaining highlighted sharps.
© Copyright 2016 SpaceClaim Corporation. All rights reserved.
