
| SpaceClaim Online Help |
|
This tool will help you identify the amount of draft and direction on each face in a design.
You can use this tool to analyze parts that will be molded. Faces shown in red (the default color for a negative draft angle) may not release properly from a mold. You should input the draft angle you consider necessary for proper release. The draft angle may depend on a number of factors, including material choice and design constraints.
Click the Draft Direction tool guide and select a face, surface, or the World Origin to set the draft direction.
If you don’t first set the draft direction, the angle is measured with respect to the Z axis.
Set the Angle in the options panel.
The face highlight color is based on the angle you specify. A face will be highlighted in the positive color if the angle of the face is greater than the Angle value and the negative color if its angle is smaller in the direction you specify. You can change these colors in the Options panel.
Click the Draft Select tool guide and select a face to check its draft angle. You can also Ctrl+click to select solids and surfaces, box-select or select objects in the Structure tree.
A color graph of the selected surfaces is displayed. Each value is an angle measurement between the surface and the selected plane.
The following tool guides help step you through the process. Use the Tab key to cycle through them. As soon as the tool guide switches, the cursor may change to reflect the active guide.
|
|
The Draft Select tool guide is active by default. Use it to select the face(s) for which you want to display draft angles. |
|
|
Use the Draft Direction tool guide or Alt+click to select an alternate reference for the draft direction. |
|
|
Use the Draft Curve |
The following options are available with the Draft analysis tool:
|
Direction |
Select One or Both to display the draft angle in one or both directions. |
|
Angle |
Slide the scale or click - or + to set the minimum angle to display. |
|
Color |
Select colors from the drop-down menus to indicate positive and negative draft angles. |
|
Color Transition |
Slide the scale or click - or + to adjust the color transition between sharp and smooth. The higher this setting, the more gradual the transition between positive and negative faces. |
|
Create shadow lines |
Display shadow lines where the angle of the face is the same as the draft angle. |
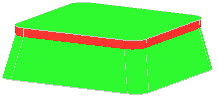
![]()
Draft analysis with color transition low (sharp)
![]()
Draft analysis with color transition set to high (smooth)
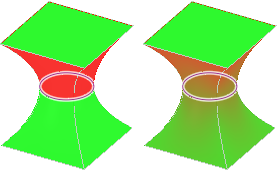
The shadow line on these examples show where the angle of the curved face is the same as the draft angle. The example on the left is shown with the Color Transition option set low, and the example on the right shows the Color Transition set high.
© Copyright 2016 SpaceClaim Corporation. All rights reserved.


