
| SpaceClaim Online Help |
|
Your zoom settings determine how a drawing sheet or design will print. For best results, select a paper size from the Print window that is the same as the drawing sheet format. If you changed the orientation of the drawing sheet, then the view that appears in the Design window is the one that will be scaled to fit the selected paper size. This can result in a clipped drawing.
Shaded designs are converted to hidden-line removed graphics style when you select Print from the File menu. Select Shaded from the Graphics Style drop-down after printing to return your design to the shaded style.
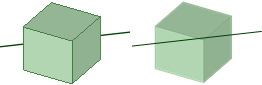
When a curve is clipped (or hidden) behind a solid or surface in the Design window, it will not be clipped when it is printed. The curve will appear to be in front of the solid or surface on the printed page. The example below shows a curve that is clipped in the Design window on the left, and the same view in print preview on the right.
Position your design in the Design window as you would like it to appear on the printed page.
Tip: Select Zoom > Zoom Extents from the Orient ribbon group in the Design tab.
You can also print the design at different zoom levels by zooming in or out, but for the best results we recommend you use Zoom Extents.
Select SpaceClaim Options from the File menu and click Detailing.
Select All New Documents from the Detailing options for drop-down list.
Click No format and select the paper size and orientation.
Click OK.
Select Print > Print Preview from the File menu to preview the print.
Use the Zoom menu to Zoom In, Zoom Out, Zoom-Box In, or Zoom Extents.
Use the Navigate tool, when zoomed in, to position the print window.
You can also set the page orientation, set print properties, and print the sheet from this window.
Select Print from the File menu.
You can also use Save As to save the sheet as a 2D PDF (*.pdf). The PDF will reflect the current format and size properties of the sheet.
Click Print in the File menu.
Select All Open Sheets for the Sheet Range.
Set the paper size, margins, and other options as desired.
Click Print.
Position your design in the Design window as you would like it to appear on the printed page.
Tip: Select Zoom > Zoom Extents from the Orient ribbon group in the Design tab.
You can also print the design at different zoom levels by zooming in or out, but for the best results we recommend you use Zoom Extents.
Select Print from the File menu.
Set the following options:
Number of copies
Paper margins: Set the margins in millimeters (mm) or inches (in).
Paper orientation: Choose between landscape or portrait mode.
Paper size: Select from the list of standard paper sizes.
Print content: Select Scene to print the design based on the size shown in the Design window. This setting is used by default for designs. Select Extents to expand the design until it fills the printable area of the page. This setting is used by default for drawing sheets.
Print scale: If you select Extents for the Print content, you can set the scale of the printed image. Enter a value for the scale, or select Scale to fit.
Shaded quality: You can set the resolution for 3D objects in dpi (dots per inch). Select System-defined to use the printer's default dpi setting.
Print to PDF: The design window and its contents scale to fit the paper size of the selected printer. The Shaded Quality is automatically set to 110 dpi, which is best for on-screen viewing. For printing, change the value to 300dpi.
(Optional) Click Preview to see how your printed design will look.
Click Print.
The Design window contents will be zoomed so that it fits the page size.
Select Print from the File menu and click Print Preview.
Select one of the following from the Content ribbon group:
Scene to display the design based on the size shown in the Design window. This setting is used by default for designs.
Extents to expand the design until it fills the printable area of the page. This setting is used by default for drawing sheets.
If you selected Extents, select or enter one of the following from the Scale ribbon group:
Scale to fit to scale the design to fit the page. This setting is used by default.
Enter a value in the scale drop-down to scale your design by that amount.
Close the print preview.
Select the Home tool from the Orient ribbon group.
Select Print from the File menu and click Preferences to display your printer's Printing Preferences window.
Set your printer settings in the Layout area to match the format and orientation of the drawing sheet.
Set the paper size in the Advanced area to match the format paper size.
If your printer only handles 8.5 x 11" paper, select the option that scales the image to fit the paper.
Click OK on the Advanced Options and Printing Preferences windows, and click Apply on the Print window.
Select Print from the File menu and click Print Preview.
Click the Display tab and check Margins in the Show group.
Click the Print Preview tab and enter the margins in the Margins ribbon group.
© Copyright 2017 SpaceClaim Corporation. All rights reserved.