


 Hide All
You can insert an origin at any location in your design where you can anchor the Move tool. You can anchor a ruler to an origin, and snap to origins while in Sketch mode. This allows you to dimension from an origin and quickly move the sketch grid to an origin. You can also insert an origin at a solid's center of mass or volume.

To insert an origin
- Click Origin
 in the Insert group on the Design tab.
 - An origin is previewed attached to the cursor.
- Move the cursor to position the origin. The origin will adjust its orientation based on the type geometry it is on.
- Click to place the origin.
To insert an origin based on selected faces
- Select one, two, or three faces.
- Click Origin in the Insert group on the Design tab.
- The origin is created based on the following:
- If one planar face is selected, the origin is created at the center of the face.
- If two intersecting faces are selected, the origin is created with XY in the first plane, Y aligned in the intersection of the two planes.
- If three intersecting faces are selected, the origin is created with XY in the first plane, Y aligned in the second, and Z placed at the intersection of the third plane with Y.
To insert an origin using the Move tool
-
Click Move
 in the Edit group on the Design tab.
 -
Position the Move handle where you want the origin to appear.
-
Select the Origin tool
 in the Insert ribbon group to insert an origin.
The origin appears in the Design window and in the Structure tree.
 To insert an origin at the mid-point between two points
-
Select the Move tool.
-
Alt+Shift+click two points to create a temporary point at the mid-point.
-
Click the temporary point to place the Move handle there.
-
Select the Origin tool
in the Insert ribbon group.The origin appears at the midpoint.
To insert an origin at the center of mass or volume
-
Click Mass tool
 from the Analysis group on the Measure tab.
 -
Select the solid at whose center you want to place the origin.
Axes appear at the center of mass or volume.
-
Select the Origin tool
in the Insert ribbon group..The origin appears at the center of mass or volume.
To place the sketch grid on an origin
- Select the vertex of an origin.
- Enter sketch mode.
The sketch grid is now located on the x and y axis of the selected origin.
To define the origin for a newly created component
- Insert an origin.
- Alt+click the origin.
- Right-click a solid and select Move to New Component from the context menu.
You can also create a new component and then drag and drop the solid into that component while the origin is Alt-selected.
- Right-click the component in the Structure tree and select Open Component.
The component opens in a new design window.
-
Display the world origin.
The world origin in the new design window is positioned at the same location as the alt-selected origin.
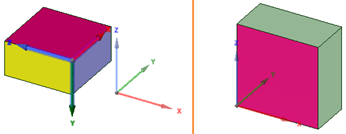
Alt-selecting an origin when creating a new component. The image on the left shows the World Origin and an origin created on the solid. The image on the right is the component opened in a new design window with the world origin in the location it was placed on the object.