


 Hide All
DesignSpark Mechanical supports Microsoft® Touch technology for Windows VistaTM, Windows 7, Windows 8. It allows you interact with your designs using a stylus or multiple fingers on a touch screen. Touch screens with multitouch capabilities improve your work experience by providing:
-
User interface controls that are always close to a finger, so you use your mouse less often.
-
3D interaction, such as panning and rotating views, that offers a different navigation mechanism than with modifier keys or separate tools.
-
More intuitive selection, because you put your fingers directly on the geometry you want to manipulate.
-
Modeling in a more hands-on environment, so it feels more like working on a real part than a virtual part.
-
Real-time, interactive design reviews using large format multitouch displays.
When using DesignSpark Mechanical’s multi touch feature, you can widen the DesignSpark Mechanical application window to span across two multi-touch monitors at the same time, or, you can move DesignSpark Mechanical between monitors to display the entire DesignSpark Mechanical window on either monitor.
While a significant effort was made to optimize the multi touch functionality to fit (and enhance) the DesignSpark Mechanical user model, the intention was never to replace the mouse entirely. Touch should be used when it feels easier to do so, and the mouse should be used alongside the touch screen. The same philosophy applies to keyboard shortcuts and even to precise selection techniques: the user is encouraged to try out touch to see where it improves the user experience - and feedback is very welcome.
Touch is incorporated into DesignSpark Mechanical in many ways:
-
Navigation (Spin/Pan/Zoom/Rotate) uses emerging Microsoft standard gestures (those having been extended from 2D to 3D).
-
Precise selection of toolbar buttons is made easier by heads-up bubble notes, that appear over the icon that a finger may obscure.
-
Radial menus have been introduced to ease the choice of selection types, as a shortcut to get to major tools, and as a method to select edge loops.
-
A flick gesture takes the place of the missing mouse wheel to select objects that lie behind other objects.
-
Where possible, difficult selections have been made easier by automatic selection, such as the one axis that is free to move in the Move tool (on assembled components).
For HID-supported devices, DesignSpark Mechanical will use the faster HID signal.
For non-supported hardware, DesignSpark Mechanical will use the Windows 7 and 8 built-in Multitouch API.
 Timing-based mode and Gizmo-based mode
Two modes have been added for interacting with the DesignSpark Mechanical touch interface:
-
Timing-based: This mode automatically chooses touch functions based on the amount of time a touch signal is maintained. For example, using two fingers moving together to immediately drag invokes panning, while holding two fingers down for a while, then moving them, invokes what are normally right-mouse-button drag mouse gestures.
-
Gizmo-based: This mode is intended to transition existing DesignSpark Mechanical users to the touch interface. Existing mouse buttons and popular keyboard buttons are placed in an on-screen gizmo, to clearly map existing functions onto the touch interface. The benefits in terms of usability are not as apparent with the Gizmo style, but users are encouraged to experiment with it. Because the gizmo buttons act exactly like the mouse and keyboard buttons, use of the gizmo will not be explicitly described here.
An exception is that using the gizmo does not allow for flicks, so to select objects that are under other objects, you must place the gizmo over the object, then drag the Select gizmo button around the gizmo circle, and it acts like rotating a wheel (and thus more directly maps to the mouse wheel function.)
The mouse experience is characterized by a cursor that is always visible, whose default mode is to innocuously move the cursor around the screen. Nothing happens with a mouse until a button is pressed, or a movement is made with a button pressed. Conversely, with touch, there is a lack of an always-visible cursor (and it would be obscured by a finger anyway.) And so in DesignSpark Mechanical, the default mode is innocuous pre-selection, until a selection is made (in various ways described below.) In the timing-based paradigm, once a selection is made, then following touch movements act as mouse-button drag actions. Here the important difference in the Gizmo is the most apparent to the user - as ALL touch movements are interpreted as pre-selection actions - and only touching the screen using the gizmo button labeled Left acts as a drag (same as the left mouse button.)
Additionally, precise sketching is made possible by the gizmo, since it is difficult to draw lines when the endpoint of the line is under the fingertip (in the timing-based scheme.)
Basic touch gestures
|
Description |
Action |
|
|
Tap |
Touch screen briefly |
|
|
Double-tap |
Touch screen briefly twice |
|
|
Triple-tap |
Touch screen briefly three times |
|
|
Touch |
Touch screen and hold. This multitouch icon pops up to show the difference between a tap and a touch.
|
|
|
Drag |
Touch screen, move finger or pen across screen |
|
|
Delayed drag |
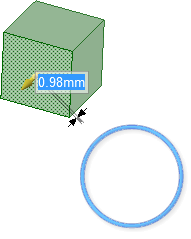
Touch screen, wait briefly, then move finger or pen across screen. This multitouch icon comes up to show that the input for the next selection will be an Alt reference (normally highlighted in blue.)
|
|
|
Flick |
Touch screen, move finger or pen a few inches, then remove finger or pen from screen |
|
|
Hover |
Move pen over screen without touching -- only works with a pen |
|
|
Radial menu |
Touch the screen with one finger and tap with two others to invoke the radial menu. Switch between radial menus with successive two-finger taps or a following tap in the center of the menu. Radial menus are disabled when using the gizmo. |
|
|
Hold |
An animation is displayed when you use a multitouch gesture with a pause, such as touching with two fingers, waiting, and then dragging to invoke gesture mode. The animation shows the wait time as the circle is drawn. When the circle is complete, then the wait time has been reached and the alternate behavior is invoked. If you lift or move your finger before the circle is complete, then the alternate behavior or mode is not invoked. So in this example of two fingers touching, it would revert to panning the view. Hold one, two, three or four fingers to invoke different functions. |
|
Navigation
|
Action |
Description |
|
Pan |
Move two fingers together across the screen. |
|
Zoom |
Move two fingers away from each other to zoom in or toward each other to zoom out. |
|
Rotate |
Hold one finger on the axis you want to rotate around and move the other finger in an arc that is centered on your first finger. |
|
Spin |
Move three fingers together across the screen. |
|
Spin on an axis |
Hold one finger on the axis you want to spin around and drag two fingers on the screen. |
|
Snap View |
Hold three fingers to activate the Snap View tool. While the Snap View tool is active, tap for a left mouse click and flick for a left mouse flick. Hold three fingers again to inactivate the tool. You can also press the Escape key to exit the tool. |
 |
If you use multiple screens, then the screen that is designated as the touch screen at the operating system level is the one for which DesignSpark Mechanical detects touch input. If a DesignSpark Mechanical session has windows on multiple multitouch displays, you can sequentially use one or the other display for multitouch interaction. |
Touch gestures in Select, Pull, and Move
|
Action |
Touch or pen gesture |
Mouse |
|
Select geometry |
Finger: Tap Pen: Hover to preview the selection, tap to select |
Click |
|
Add or remove geometry from selection, remove query-selected edge loops |
Ctrl + tap |
Ctrl + click |
|
Add geometry to selection |
Shift + tap In Pull and Select: Drag to prehighlight the object(s), then lift your finger. |
Shift + click |
|
Add geometry to alternate reference selection |
Alt + tap
|
Alt + click |
|
Select a tangent chain of edges, tangentially connected faces, successive edge loops, etc. |
Double-tap or touch and double-tap
|
Double-click(s) |
|
Select a solid |
Triple-tap or touch and triple-tap |
Triple-click |
|
Select the next face or edge (that is behind a face or edge) |
Finger: Drag to preselect, then flick one finger up
|
Scroll the mouse wheel |
|
Box-select |
Finger or pen: Touch, pause, and drag to the right or left |
Click, hold, and then drag to the right or left |
|
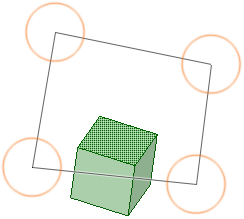
Box-select with four fingers |
There are two modes:
This allows you to preview and change your selection before it becomes final, rather than getting one chance to select the objects you want. Slight finger movements will not interrupt the previewing. |
n/a |
|
Lasso-select faces or edges |
Invoke lasso selection with the radial menu |
Click Select, then click Using Lasso |
|
Paint-select |
Invoke paint selection with the radial menu |
Click Select, then click Using Paint |
|
Invoke a context-sensitive menu (a right-mouse-button menu) |
Finger or pen: Touch long enough to show the multitouch circle, then lift finger or pen Pen: Tap with pen button pressed If using the gizmo, just click the button labeled Right on the gizmo. |
Right-click |
|
Use gesture recognition (see Mouse and touch gestures) |
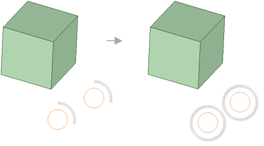
Finger: Touch with two fingers, pause, then drag in the gesture pattern. You will know when the gesture can start when two multitouch circles like this pop up under your fingers:
Pen: Touch and drag in the gesture pattern with the pen button pressed If using the gizmo, just drag the button labeled Right on the gizmo. |
Gesture with the right mouse button |
|
Reset all pen and touch input |
Ctrl + Shift + F2 |
n/a |
|
Invoke magnifying loupe window |
Ctrl + Shift + F3 (This slows down drag by 10% for precise selection with tap, double-tap, or up-select.) |
n/a |
|
Invoke keypad for Ctrl, Alt, Shift, Tab, Esc, Enter, and Space |
Ctrl + Shift + K (This is useful for tablet PCs on which the keyboard is obscured by the rotated screen.) |
n/a |
|
Select more while pulling |
While something is selected and being pulled with one drag action, pause the drag action (keep the finger down), and use a finger of the other hand to select more geometry with the standard MT selection methods. Continued dragging of the first finger will now pull the new (augmented) selection. If the second selection is started with a Touch-Hold, until the multitouch icon turns blue, and then continued through to the selection, then that second selection is treated as an Alt-reference - and the Pull tool reacts accordingly. |
n/a |
|
Navigate while pulling |
While something is selected and being pulled with one drag action, pause the drag action (keep the finger down), and use two or three fingers of the other hand to perform Spin/Pan/Rotate/Zoom actions. Continued dragging of the first finger will now pull the existing selection - at the same time as the model is being navigated visually. |
n/a |

Multi-touch with the Pull tool
-
Select and drag geometry to change it.
-
Immediately drag to pre-highlight geometry. You can also touch in white space and drag to pre-highlight. This shows you what will be selected before you select it.
-
After you pre-highlight geometry, tap with a second finger or raise the first finger to select the geometry.
-
Press the spacebar to enter dimensions for an offset face, just like you can when you use a mouse instead of multitouch.
-
Starting on whitespace, drag with one finger, then hover over an edge and double-tap with another finger to query select through the available edge loops. This behavior is the same as a simple double-tap.
-
Starting on whitespace, drag with one finger, then hover over a face and triple-tap with another finger to select all the faces of the body. This behavior is the same as a simple triple-tap
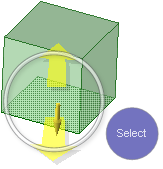
Multi-touch with the Move tool
-
Select faces, bodies, or components to move or rotate.
-
Select secondary objects to set the direction.
-
Re-anchor the move handle by dragging the yellow ball at its center.
- Tap to activate a rotation or linear axis. This is easiest to do using a pen, or if just fingers, by dragging along then up-to-select.
- Drag to move or rotate geometry.
Multitouch with Windows Vista™
Multitouch devices are automatically detected on computers running Windows Vista™, and DesignSpark Mechanical can be run using these devices on Vista™. You may need to configure one display at a time to avoid common problems with multiple displays and multitouch on Vista™ (a symptom of this is dragging a finger across the multitouch screen's desktop, only to see a box made on the other screen).
You should set up the multitouch screen as the only display device first (make it the primary display), then configure your second display device. After this, the setting is remembered and you can drag the DesignSpark Mechanical session from one screen to the other, using multitouch as it is available.