


You can set snapping options for sketching and editing solids. Units for snap options are set by your Units options for all new documents.
To customize snap options
-
Select DesignSpark Mechanical Options from the Application menu to display the DesignSpark Mechanical Options window.
-
Click Snap from the navigation panel on the left.
-
Modify the options on the page.
-
Click OK to save all your changes and close the window.
 |
If you try to enter a value that is out of the allowed range in the Options panel or the DesignSpark Mechanical Options dialog, you will see a red exclamation mark icon next to the field. You can hover over the icon to see a tooltip that will explain the valid values for the option. |
To set incremental options for sketching on the sketch grid
-
Check Angular snap to snap to objects while sketching.
-
Enter the angle increment you want to snap to when you select the Snap to angle option in Select, Move, and Sketch tools.
To enable snapping to objects when sketching on the sketch grid
-
Check Enable snapping in sketches to snap to objects while sketching.
While you sketch, objects you can snap to are highlighted. The points to which the sketch tools are snapping appear as messages in the status bar.
-
Check the box next to each item in the list to determine which objects you can snap to while sketching:
-
Line - Snap points along lines (at intersections with sketch grid) indicated by rectangles
-
End point - Snap points at all end points indicated by squares
-
Midpoint - Snap point at center of lines indicated by triangles
-
Arc/circle center - Snap points at center of arcs and circles indicated by circles
-
Tangent from end point - Snap points at tangent angle to end points indicated by tangent guides
-
Perpendicular from end point - Snap points perpendicular angle to end points indicated by perpendicular guides
-
Tangent/perpendicular from line - Snap points at tangent and perpendicular angles along lines indicated by tangent and perpendicular guides
-
Parallel to line - Lines parallel to the sketched line indicated by highlighting
-
Parallel to grid - Snap enabled parallel to the grid when snap to grid is disabled
-
Grid - Snap enabled to the grid
-
To set incremental options for editing solids
-
Check Linear snap to snap to constrain to a linear increment and set the linear interval for tool movements in the Incremental area.
For example, if you set the Linear increment to 1 mm, you will pull to whole millimeters instead of fractions of millimeters.
-
Check Angular snap to snap to constrain to an angle increment and set the degree interval for tool movements in the Incremental area.
For example, if you set the Angular increment to 5 degrees, you will move in larger increments than if set to 1 degree.
To set snapping options for editing solids
-
Check Enable snapping to solids with the Shift key to snap when you press and hold Shift using any tool.
-
Check the box next to each situation or object in the list to determine when a tool will snap while editing solids:
-
Face parallel - Snap to a parallel face
-
Rotate parallel to face - Snap to a parallel face when rotating
-
Rotate perpendicular to face - Snap to a perpendicular face when rotating
-
Edge - Snap to any edge
-
Cylinder radius - Snap to the radius of a cylinder
-
Round radius - When creating a round, snap its radius the radii of existing rounds on the component
-
To set the nudge options
You can change the values for Distance or Angle:
-
Normal - The nudge increment when you press Alt and an arrow key.
-
Small - The nudge increment when you press Alt + Ctrl and an arrow key.
-
Big - The nudge increment when you press Alt + Shift and an arrow key.
Examples
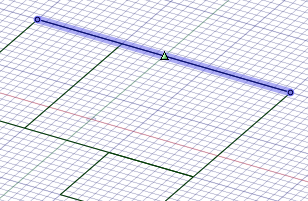
Snapping to the midpoint of a line
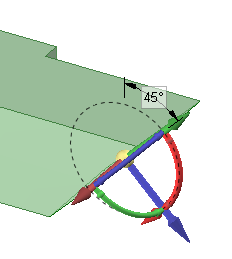
Editing a solid with angular snap set to 15 degrees

Snapping to a round radius