


You can use multiple planes to quickly clip your design to show only the geometry on one side of a plane or the other.
Clip with Plane options includes Clip, Reverse Direction, and Union. Planes, axes, and annotations are not clipped.The image below shows how planes in different clip states display in the Structure tree:
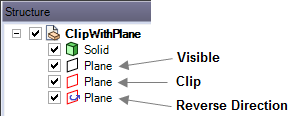
By default, when you create a plane, the Structure tree displays a black-outlined visible plane icon. You can select a visible plane you want to clip from either the Structure tree or in the Design window, then right-click anywhere in the Structure tree or Design window to display the Clip with Plane context menu.
You can select up to 10 planes to set a clipped volume. Planes selected for clipping display with red boundaries in the design window.
As you develop a model, you can also work with Clip with Volume to create a spherical clip volume around an object so that you can selectively isolate a specific region, element, or section of a design.
To clip your design with a plane or multiple planes
-
Select a plane, or, use Ctrl+Select to select multiple planes.
-
Right-click and hover over Clip with Plane to display the entire context menu.
-
Select Clip.
The plane or planes you clipped display with a red outline. Icons update in the Structure tree. With the plane(s) selected, you can modify values in the Properties panel.
To restore the view of your design, right-click the plane and select Clip again.
By default, when clipping is initially set, on or more selected planes automatically combine using an “and” operation. This way you can isolate the inside of two parallel planes or the inside of 3 pairs of parallel planes (one of the most common usages for this feature.).
 >
>
To reverse the direction of the clipped view with a plane or multiple planes
-
Right-click a plane and hover over Clip with Plane to display the entire menu.
-
Select Reverse Direction.
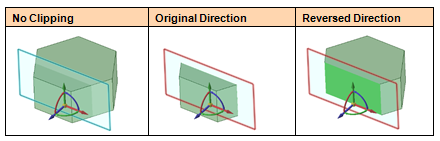
The geometry of your design flips to what is on the other side of the plane. To return to the original clipped view of your design, right-click the plane and select Reverse Direction again.
To view the plane's direction, click the Move tool. The blue arrow on the Move tool indicates the positive direction of the plane. The reversed direction is the opposite direction of the blue Move tool arrow, as shown below:
Selecting multiple planes for clipping adds them to an ‘or’ set. With a group (2 or more) of planes, you can also right mouse click, then select Union from the Clip with Plane context menu. This option is essentially an “or” operation that defines a plane group that you intend to combine with the rest of the planes. Once you define and unite a group of planes, the Union set is put at the beginning of the logical set, and the rest of the planes follow with their default “and” states.
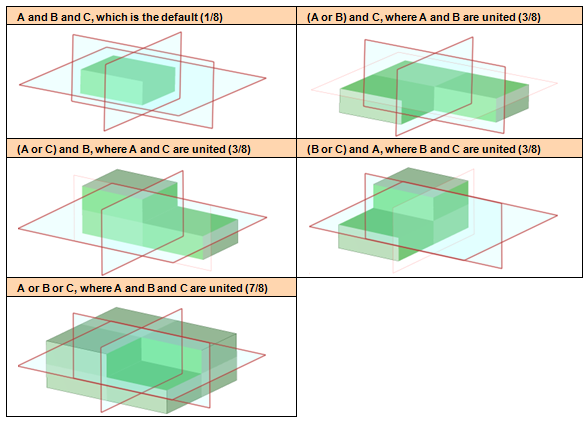
For example, you can select 3 planes and get these logical sets, as shown in the table of images below:
- A and B and C, which is the default (showing 1/8 of the model)
- (A or B) and C, where A and B are united (showing 3/8 of the model)
- (A or C) and B, where A and C are united (showing a different 3/8 of the model)
- (B or C) and A, where B and C are united (showing a different 3/8 of the model)
- A or B or C, where A and B and C are united (showing 7/8 of the model)
To create a union between planes
-
Ctrl+Select more than one plane.
-
Right-click one plane and hover over Clip with Plane to display the entire menu.
-
Select Union.
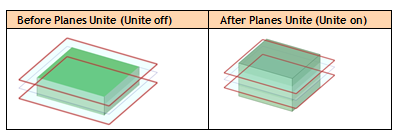
The image below shows the results of uniting two planes. Sets of parallel planes default to keeping the material inside:
When you save a model with clipped planes, and you are working with the model in various clipped plane states in two or more design window panes, the clip state of each plane in the model is saved per window with the model. As you move between window panes, the Structure tree updates to reflect the clip state of each plane in the active window context.