| DesignSpark Mechanical Online Help |
|
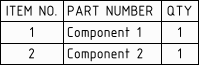
You can insert a Bill of Materials (BOM) onto your design or drawing sheet. BOM values are automatically populated for both internal and external components that are part of an assembly. DS Mechanical only itemizes components; if the design only has solids in the structure tree, they will not be included in the BOM. The QTY column in a design's BOM table shows the number of sub-components, not items, that are included in an assembly.
When a drawing includes a BOM table that contains data added with a newer service pack of DS Mechanical than you are using, the new columns are displayed in red. This indicates that the data cannot be changed, and can only be viewed.
You can include X, Y, and Z dimensions of components in a BOM table. The extents shown are the exact extents of all solid and surface geometry in the component, for both visible and hidden solids and surfaces. Sketch curves, bitmaps, and other entities are not included in the extents. Use these dimensions to create a cut list of parts in an assembly of panels in the BOM, along with their number and dimensions. See the instructions for adding a column to a BOM table below.

Click the arrow next to the ![]() Bill of Materials tool in the
Bill of Materials tool in the
Top level: Creates a table that includes only parent components (or parts):

Parts only: Creates a table that includes all child components:
Indented: Creates a table that includes all components, with child components indented:

The last type of BOM you created is remembered and will be automatically chosen if you click the BOM icon instead of the drop-down arrow.
(Optional) If you created a view of a component on the drawing sheet, select the component on the Options panel to create a BOM for just that component.
(Optional) Modify the Bill of Material's properties in the Properties panel.
The Hidden components option allows you to control whether or not hidden components will be included in the BOM.
There are many other options for controlling the cosmetics of the BOM.
Click to place the Bill of Materials on the design or drawing sheet. The table appears in gray until you place it, and it changes to black after it is placed.
To cancel, press the Esc key before you click to place the table.
The BOM appears in the Structure tree.
You can copy and paste a BOM, and you can copy the contents from a BOM table and paste them into Microsoft Excel.
When you change a value in a BOM table, the property is changed. You can also select the BOM and edit its properties in the Properties panel.
Select a row or column, right-click, and select from the menu to Insert rows or columns.
Select a row or column, right-click, and select from the menu to Delete rows or columns.
You can only delete rows that you insert
You cannot delete all columns. If there is one column left, it cannot be deleted.
Table from the menu to divide the BOM into two tables, for example, if necessary to fit on the drawing sheet.Re-size a table by dragging the circles at its corners or edges.
Rotate a table by dragging the green circle at the top of the table.
Right-click an existing column and select Insert > Insert Columns to the Left or Insert Columns to the Right.
Select the new column by clicking above the first row of the column, like this:

Select a Column Type in the Properties panel.
Select a Column Value if you selected Document Property, Material Property, or Custom Property for the column type. The values in the column will be automatically filled-in.
If you select Material Property for the column type and Mass or Volume for the column value, then the column data will only be filled-in when a material has been assigned to the object.
Click on a BOM table, then click its edge to select the entire table. The edge will change from a dashed line to a solid line when you have the entire table selected.
Right-click the table and select Save Table As.
Select HTML, XML, BOM Template (.scbomtemplate) for the Save as type.
If you choose 'BOM Template' as the type, all the formatting, header, table properties, and contents are saved to an .xml file which you can edit.
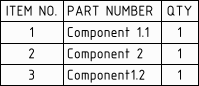
You can sort the columns in a BOM table.
You can manually edit any values in the BOM but any sorts have to be re-done to update the table.
Sorting works with indented and regular BOM's.
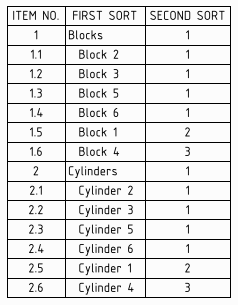
Sequential sorting is remembered across columns. Below is an example of two sequential sorts:
You can group rows in a BOM table based on a selected Custom Property.
Notes on row grouping:
Example:
| BOM with "Part Type" custom property column added |

|
| Group Using property set to "Part Type" and default row numbering |

|
| Start groups from property set to Number rows sequentially |
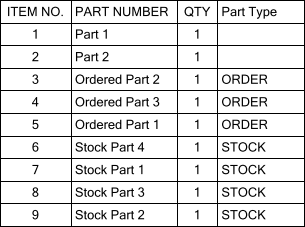
|
© Copyright 2020 Allied Electronics, Inc. All rights reserved.