| DesignSpark Mechanical Online Help |
|
Select the ![]() Pull
Pull tool in the Edit group on the Design tab. The Select tool guide on the right side of the Design window should be active.
Select the face or surface you want to offset or extrude.
You can select multiple surfaces and faces of solids to offset or extrude them simultaneously.
(Optional) Add edges to your selection.
Select the edges of the face that you want to extrude when you pull. (Any unselected edges are defined by the neighboring geometry during the pull, creating an offset instead of an extrusion.)
(Optional) Select the Direction tool guide  , then click the straight line, axis, or edge if you want to offset or extrude in a different direction.
You can also Alt+click a straight line, axis, plane, origin axis, or edge. Sometimes DS Mechanical guesses your intent incorrectly when you Alt+click the direction line. If this happens, just use the Direction tool guide to correct it.
The pull direction is shown in blue and the pull arrow is reoriented.
Click and drag the face in the direction of the Pull arrow.
| Dragging a: | Does this: |
|---|---|
|
Solid |
Offsets the face in its natural offset direction |
|
Solid |
Creates an extrusion |
|
Surface |
Thickens or thins the face |
|
Corner |
Creates a round, chamfer, or extrusion, depending on the selected option |
|
Round |
Offsets the round or chamfer |
|
Variable round |
Uniformly offsets the variable round |
|
Cylinder, torus, or cone |
Offsets the cylinder, torus, or cone |
To dimension the offset, type the distance you want to pull and press Enter.
Press and hold Ctrl to offset a copy of the face as a surface.
Neighboring faces automatically extend to bound the offset face.
You can also use the Up To tool guide to pull up to any edge, plane, surface, or face in your design. If you pull a round, chamfer, or cylinder with the Up To tool guide, and pull up to similar geometry, the radius or offset is changed to the dimension of the Up To face you select.
The following options are available in the Pull tool. Once you select the edge or face to pull, select these options from the Options panel, or right-click and select them from the mini-toolbar:
|
|
Select the Add option to only add material. If you pull in a subtractive direction, no change will occur. You can combine this option with other Pull |
|
|
Select the Cut option to only remove material. If you pull in an additive direction, no change will occur. You can combine this option with other Pull |
|
|
Pulls without merging into other objects even when the object pulled intersects with an existing object. |
|
|
Select a single, detached edge, imprinted edge, or surface, then click this option to pull both sides of the edge or surface at once. |
|
|
Select this option, then click to connect a ruler, oriented along the pull axis, to an anchor edge or face. You can use the ruler to dimension the pull. The direction must be specified to successfully create a ruler dimension. Press Esc to cancel the ruler dimension. |
|
|
Pulls the element so it mates with the surface of the selected body or be pulled up to a plane through the selection. You can find this option in the mini-toolbar and it is the same as the Up To tool guide. |
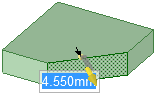
Selecting a face to offset
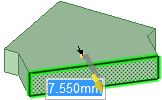
Selecting a face and edges to extrude
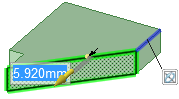
Selecting a face and edges, and setting a direction to extrude in a direction
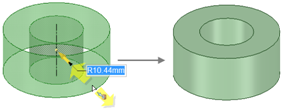
Pulling an inner cylindrical surface up to an outer surface to create a solid ring
© Copyright 2020 Allied Electronics, Inc. All rights reserved.