
| SpaceClaim Online Help |
|
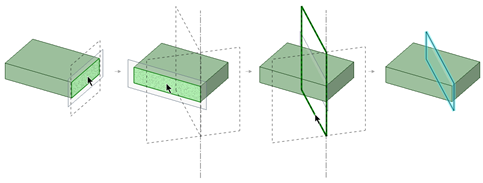
You can define a plane by selecting various faces, edges, axes, or lines in your design. You can select any combination of coplanar axes, curves, edges, and coordinate axes.
The plane will extend a small amount beyond the edges of the face to make it easier to work with. The plane will maintain this margin around all the objects in your design, extending and trimming itself as you add, remove, or move solids within your design.
Planes are useful for creating layouts and annotations. Planes are not linked to the geometry used to create them; they must be explicitly selected to move along with other items. You can also use a plane to quickly clip your design to show only the geometry behind the plane.
Select one of the following:
| Select a: | To insert a plane: |
|---|---|
|
That contains the face |
|
|
Planar face and point |
Through the point and parallel to the face |
|
Planar face and edge |
Through the edge and perpendicular to the face (useful when creating a sweep path) |
|
Two parallel planar faces |
At the midpoint between the two faces |
|
Axial or cylindrical face |
Tangent |
|
Two axial faces with parallel axes |
Tangent to both faces as close as possible to the selection points |
|
That contains the edges |
|
|
That contains the axis |
|
|
Two axes |
That contains the axes |
|
Two origin axes |
That contains the axes |
|
An origin |
Three orthogonal planes |
|
Axis (or line) and one point |
That contains the axis (or line) and the point |
|
End point of any line |
Through the end point and normal to the line at the end point |
|
Control point of a spline |
Through the selected point and perpendicular to the plane that contains the spline |
|
Three points |
That contains those three points |
|
Line sketched on a plane |
Through the line and normal to the plane |
|
Line and point on the line |
Through the line and the point |
|
Two planar lines |
That contains those two lines |
|
Two points |
Through the two points |
|
Two points and a Plane or planar face |
Through the two points and perpendicular to selected plane or planar face |
(Optional) Click the Build Plane tool guide to select reference objects, then select a temporary (dotted) plane to create the one that you want from the possible planes. See Inserting temporary points, axes, and planes for detailed information about creating temporary planes.
An error message is displayed in the status bar if your selection does not define a plane.
Select a plane, Ctrl+click a cylinder, then click the Plane tool.
Select a cylinder, Ctrl+click a plane, then click the Plane tool.
Select the Plane tool.
In 3D mode or Section mode , Alt+Shift+click two points to create a temporary plane that includes the midpoint.
Click the temporary plane.
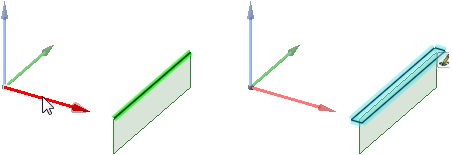
Select the Plane tool.
Activate the Align to Screen tool guide 
Hover over geometry to preview the plane through the selected geometry and parallel to the screen.
Select the geometry to create the plane.
Right-click a plane and select Clip with Plane. To restore the view of your design, right-click the plane and select Clip with Plane again.
Planes, axes, and annotations are not clipped.
An edge and the axis of a coordinate object selected to create a plane.
You can use the Fill,Outline, and Clipface options to change the appearance of a plane.
© Copyright 2016 SpaceClaim Corporation. All rights reserved.