
| SpaceClaim Online Help |
|
Use the ![]() Project tool to create edges on a solid's face by extending the edges of another solid, surface, sketch, or note text.
Project tool to create edges on a solid's face by extending the edges of another solid, surface, sketch, or note text.
When you project onto a face, the tool makes a new surface to hold the projected edges, if possible.
Select the edges, face, surface, sketch, or note text whose edges you want to project.
Select an object in the Structure tree to project all the edges of the object.
The projection occurs perpendicular to the selected object onto the nearest solid faces. The nearest solid faces are determined automatically.
(Optional) Click the Select Direction tool guide and select a face or edge to change the direction of the projection.
(Optional) Click the Select Target Faces tool guide and select the face(s) on which you want the edge projected.
Select from the following options in the Options panel:
Project through solids: Project the edges on all faces through the entire solid instead of just the faces closest to the object you project.
Project silhouette edge: Projects the outline, or silhouette, of a part. You must set the direction using the Select Direction tool guide.
Extend projected edges: Extend the projected curves to the edge of the face(s) they are projected on.
Extend target faces: Extend the target face when the projected face is larger than the target. See the example below.
The projection preview is shown in purple, and will be updated based on the options and tool guides you use.
Click the Complete tool guide or press Enter to project the edges.
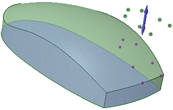
Sketched 3D Points can also be projected onto surfaces using the Project tool. The projected points are created as Datum Points so that they can be pinned.
In the example below, points were sketched to trace out the shape of a mouse button and then projected down onto the top surface of the mouse. The workflow is the same as projecting Faces, Surfaces, Curves, Edges, or Note Text.
The following tool guides help step you through the process. Use the Tab key to cycle through them. As soon as the tool guide switches, the cursor may change to reflect the active guide.
|
|
The Select Curves tool guide allows you to select the curves you want to project. |
|
|
The Select Direction tool guide allows you to select the direction in which the curves will be projected. If you don't use this tool guide, the curves will be projected in both directions. |

|
The Select Target Faces tool guide allows you to select the face(s) that the curves will be projected upon. |

|
The Complete tool guide projects the edges. |
The following options are available in the Options panel:
Project through solids | Project the edges on all faces through the entire solid instead of just the faces closest to the object you project. |
Project silhouette edge | Projects the outline, or silhouette, of a part. You must set the direction using the Select Direction tool guide. |
Extend projected edges | Extend the projected curves to the edge of the face(s) they are projected on. |
Extend target faces | Extend the target face when the projected face is larger than the target. See the example below. |
Wrap around target | Projects a planar object, text, or note onto cylindrical or multiple planar faces and wraps it around the faces. This option also works for conical surfaces and over target tangent face boundaries. |
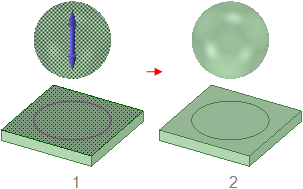
Projecting a sphere onto a planar face. Because a sphere has no edge to project, you must choose Project silhouette edge in the Options panel.

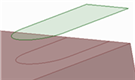
Projecting an edge with the Extend target faces option enabled. The rectangular face was chosen with the Select Target Faces tool guide.

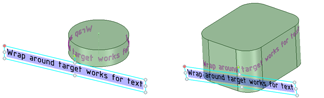
Wrapping a planar object and text onto cylindrical faces with the Wrap around target option.
© Copyright 2016 SpaceClaim Corporation. All rights reserved.

