You can revolve an edge to form a surface with the Pull tool. You can revolve the edge of a solid or surface.

To revolve an edge of a solid or surface
-
Select the
 Pull tool in the Edit group on the Design tab. The Select tool guide on the right side of the Design window should be active.
 -
Select the edges you want to revolve.
-
Alt+click a straight line, axis, or edge to set the rotation axis.
You can also select the Revolve tool guide, then click the revolve axis. The revolve axis is shown in blue.
-
Click and drag in the direction of the Pull arrow to revolve the selected edge or select the Up To tool guide and click an edge or face to revolve up to.
Ctrl+click to select edges of faces along with the face to force the pull tool to create new neighboring faces to contain these edges (essentially changing from a draft to a revolve). Unlike other CAD products, DesignSpark Mechanical allows revolving planar and non-planar edges and faces about lines that do not lie in those planes. This allows skewed rotational solids and surfaces.
You can use the Up To tool guide when you revolve edges.
To dimension the rotation, type the rotation angle while the Revolve handle is displayed and press Enter.
To revolve an edge of a surface
-
Select the
 Pull tool in the Edit group on the Design tab. The Select tool guide on the right side of the Design window should be active.
 -
Select the outside edge of a surface.
-
(Optional) Hold Ctrl and select an end point to maintain constant radius as the edge is revolved.
If you don't select an end point, the edge will follow influencing sides of surfaces or solids, if they exist. A side influence can be another edge of the surface if it lies in the same plane, or a solid or surface that touches the end of the edge. See the examples below.
-
Alt+click a straight line, axis, or edge to set the rotation axis.
You can also select the Revolve tool guide, then click the revolve axis. The revolve axis is shown in blue.
-
Click and drag in the direction of the Pull arrow to revolve the selected edge.
To dimension the rotation, type the rotation angle while the Revolve handle is displayed and press Enter.
Options
The following options are available in the Pull tool. Once you select the edge or face to pull, select these options from the Options panel, or right-click and select them from the mini-toolbar:
|
|
Select the Add option to only add material. If you pull in a subtractive direction, no change will occur. You can combine this option with other Pull options. |
|
|
Select the Cut option to only remove material. If you pull in an additive direction, no change will occur. You can combine this option with other Pull options. |
|
|
Pulls without merging into other objects even when the object pulled intersects with an existing object. |
|
|
Once you select the edge about which to revolve or sweep, click this option to revolve 360 degrees or to the next face, sweep through the full trajectory, or blend through selected faces. |
|
|
Pulls the element so it mates with the surface of the selected body or be pulled up to a plane through the selection. You can find this option in the mini-toolbar and it is the same as the Up To tool guide. |
Examples

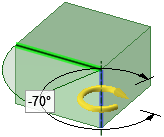
Revolving the edge of a solid to create a surface.

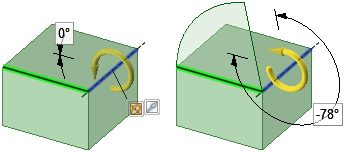
Revolving an edge of a surface that is not in the plane of the surface makes an edge with a constant radius because the edge has no side influence in this direction.

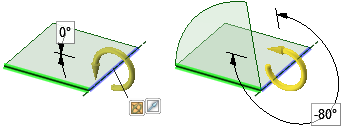
Revolving an edge of a surface with side influence makes an edge that is influenced by adjacent edges.

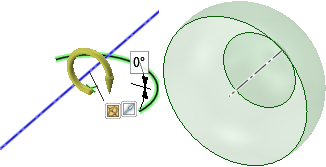
Revolving an edge of a surface with side influence with its end-point selected makes an edge with a constant radius.

Revolving an edge that crosses the axis will create more than one surface or solid if the edge is not symmetrical across the axis.


