


Creating a Slot
-
Click
 Pull in the Edit group on the Design tab.
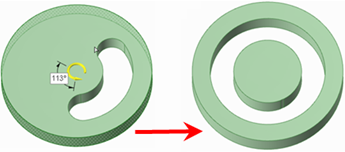
Creating a Curved Slot
Select the axis or face of a hole.
Select the Rotate tool guide and click the axis of the driving cylinder.
You can also Alt+click the axis of the driving cylinder.
Pull the hole to create a curved slot.
You can pull a curved slot 360 degrees to make a round cut.
Creating a Radial Slot
Select the axis or face of a hole.
Do one of the following:
Alt+click the face of the driving cylinder to set the direction of the Pull towards the axis of the driving cylinder. Click the Pull Direction tool guide and pull the hole to create a radial slot.
Ctrl+click the face of the driving cylinder to set the direction of the Pull towards the axis of the driving cylinder. Click the Pull Direction tool guide and pull the hole to offset the cylinder and create a radial slot simultaneously.
Select the Pull arrow that points toward the axis and pull.
If you want to lengthen a radial slot while keeping it the same distance from a radial face, Ctrl+click the radial slot's axis and the face, then pull.
If you want to move a slot along with a radial face Ctrl+select the hole's axis and the face, then Ctrl+pull.
Creating an Offset of a Radial Slot
Select an axis of a slot.
Hold the Alt key and select the cylinder face or face to set the offset direction.
Hold the Ctrl key and pull or enter a radius value.
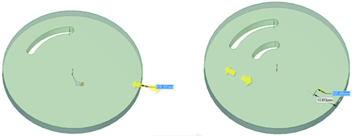
Creating a Swept Slot
Select the axis of a hole.
Select the
 Sweep tool
guide.
Sweep tool
guide.Click the sweep trajectory.
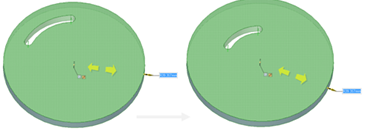
A sweep mode arrow indicates the beginning of the sweep.
Click and drag in the direction of the Pull arrow to sweep the selected objects.
You can also select
 Full Pull from the Options panel or the mini-toolbar to sweep the
entire length of the trajectory. If you select Full Pull and the face or
surface being swept is in the middle of the trajectory, it will be swept
in both directions.
Full Pull from the Options panel or the mini-toolbar to sweep the
entire length of the trajectory. If you select Full Pull and the face or
surface being swept is in the middle of the trajectory, it will be swept
in both directions.
Editing a Slot
You can modify a hole that was dragged to form a slot by pulling on any of the slot axes.
If the slot has a rounded or chamfered edge, double-click the round or chamfer to change its dimensions.
If you select Detach first in the Options panel, then the slot will become a solid if you use the Move tool to move it off the body, as shown below.

Moving a Slot Radially
Select the Pull tool.
Select both axes of the slot.
Do one of the following:
Alt+click the face of the driving cylinder to set the direction of the Pull towards the axis of the driving cylinder. Click the Pull Direction tool guide and Ctrl-drag to move the slot radially.
Ctrl+click the face of the driving cylinder to set the direction of the Pull towards the axis of the driving cylinder. Click the Pull Direction tool guide and Ctrl+drag to offset the cylinder and move the slot.
You can also move a hole radially by pressing Shift while dragging it with the Pull tool.
Removing the Slot Relationship
Right-click a face of the slot and select Remove Association.
Any changes you make to the slot's face will affect only that face.