To assign a material, from the Structure tree select the design at the top level, or
select the component for which you want to assign a material, and then click the
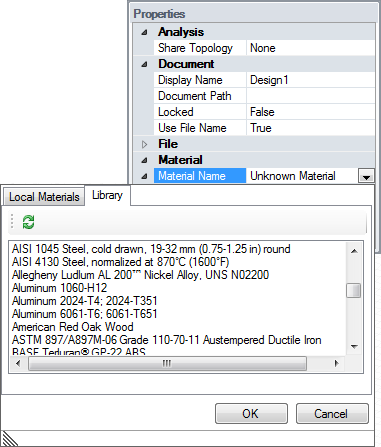
Material Name drop-down from the Material group in the Properties panel.
From the Thickness group in the Properties panel, click the gage drop-down,
and select a gage.
You can specify material properties for a component in several ways:
Selecting a Material from the Materials
Library
Select a component in the Structure tree.
In the Properties pane, expand Material
properties.
Click in the Material Name field
to display the Materials Library.
Select the Library tab.
Select a material and click OK.
The material
and its properties are displayed and can be edited in
the Properties panel. The material also appears in the
Local Materials tab and saves with the RSDOC file. You
can download materials from Resources in DesignSpark Mechanical
options.
Selecting a Material from the Local Library
Select a component in the Structure tree.
In the Properties pane, expand Material
properties.
Click in the Material Name field
to display the Materials Library.
Select the Local Materials tab.
Select a material and click OK.
The material
and its properties are displayed and can be edited in
the Properties panel. The material also saves with the
RSDOC file.
You can rename, copy, and delete
Materials from the Local Library. You can also create
new Materials.
Creating a Material
Select a component in the Structure tree.
In the Properties pane, expand Material
properties.
Click in the Material Name field
to display the Materials Library.
Click the New button to create a new
material.
Enter the name of the material.
Click OK.
Enter the density of the material in the Density
property.
If you specified the density for the
material elsewhere in the design, or specified it in the
same DesignSpark Mechanical session, DesignSpark Mechanical displays that value
in the Density property for you.
(Optional) Expand other material properties and enter
their value and units.
The material and its
properties appear in the Local Materials tab and save
with the RSDOC file.
To remove a material from a component, select Unknown Material from the Local
Library.
You can only change the Density value for material properties. All other values are
determined by the material you select.
In the Local Materials tab, you can also do the following:
Select a material and click the Copy button. A new material is created
with the original name and "Copy 1" appended
Delete selected materials
Rename selected materials
Select a material and click the Add to Library button to add that material to
the Library.


 in the Material Name field
to display the Materials Library.
in the Material Name field
to display the Materials Library.