
| ANSYS Discovery SpaceClaim |
|
This tutorial will teach you how to create groups in Discovery SpaceClaim to drive changes in ANSYS Workbench.
Click on the following link and save the file on your computer: keychain.scdoc.
Open the document in Discovery SpaceClaim.
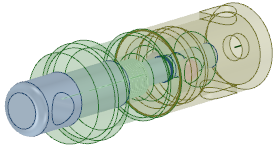
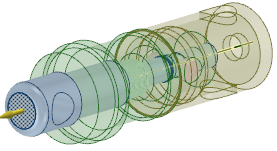
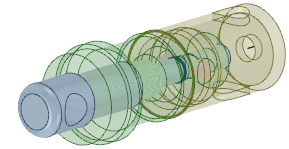
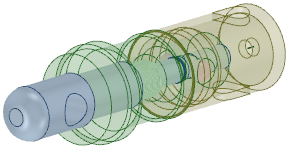
The design looks like this:

|
If you are using the online version of the help, the model will be downloaded as a zip file. You need to save it to your disk and change the file extension from ".zip" to ".scdoc" |
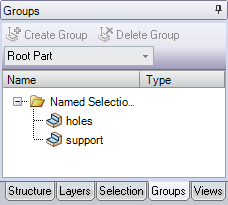
You can find the Groups tab in the same panel as the Structure tree, on the left side of the Discovery SpaceClaim window. See Working with groups for more information about groups and the Groups panel.
Groups can include driving dimensions and named selections. You can use both of these types of groups in ANSYS Workbench.
A named selection group allows you to quickly select a group of faces or edges in Discovery SpaceClaim or ANSYS Workbench.
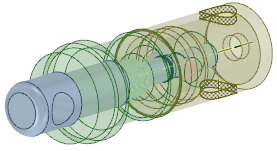
Select the two cylindrical holes on the right side of the model:
Click Create Group in the Groups panel or press Ctrl+G.
Group1 appears in the Groups panel under Named Selections.
Named selections are sent to ANSYS and the faces can be used for supports or loads.
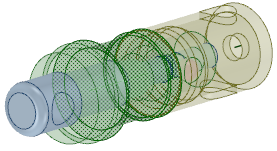
Select several surfaces on the green solid:
Click Create Group.
Group2 appears in the panel under Named Selections.
Right-click the groups and rename Group1 to holes and Group2 to support:
These names will make it easier to identify the groups when you are working with the design in ANSYS.
Driving dimension groups can be used in ANSYS to change your design, without going back to Discovery SpaceClaim and transferring the changes to ANSYS.
Select the round on the left side of the model:

Click Create Group in the Groups panel.
A driving dimension was created instead of a named selection. This driving dimension can be used to change the radius of the round. This is because the face selected is a round, which has a dimension property that can be controlled from the property panel.
Click Pull in the Edit group on the Design tab.
Select the hole on the right side of the model:

Notice that there is a dimension on the screen. When a dimension is showing and you create a group, you will usually create a driving dimension.
Click Create Group.
A group is created in the Driving Dimensions folder in the Groups panel.
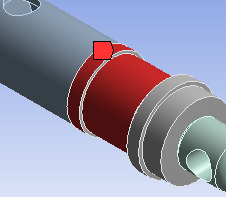
Select the top face of the blue part:
Click Create Group.
This time a named selection was created. This is because the face you selected doesn't have a dimension showing when the Pull tool is active, and there is not a dimension to be saved with the group.
Delete the group created in the previous step because we won't use it later.
Select the top face of the blue part again, and then click the ruler icon in the mini-toolbar or in the Options panel:
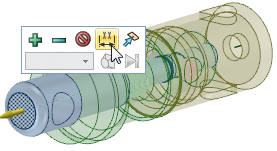
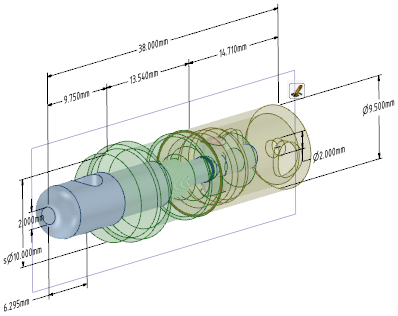
Select the opposite end of the model to make a ruler dimension that controls the total length of the design:
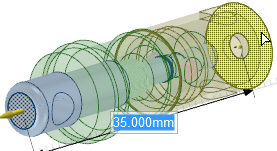
Click Create Group.
A group is created under Driving Dimensions.
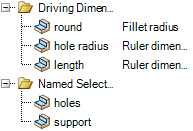
Rename the groups so their uses will be easier to recognize in ANSYS:
Now let's send the design to ANSYS and work with the groups.
Click ANSYS Workbench on the ANSYS tab.
Open the default geometry options dialog in ANSYS. See Configuring Discovery SpaceClaim and ANSYS 11 or Configuring Discovery SpaceClaim and ANSYS 12 and 12.1 for instructions.
The Default Geometry Options control how the named selections and parameters are transferred to ANSYS and are located in different places in ANSYS versions 11 and 12.
You must delete the NS and DS prefixes so all of your parameters and named selections are sent to ANSYS.
Expand the Named Selections in the Workbench structure tree to view the named selection groups sent over from Discovery SpaceClaim.
The faces stored in the named selection are highlighted in red.
Click Geometry in the structure tree.
The driving dimensions groups are sent to ANSYS Workbench as properties. You can find these properties in the lower left corner of the ANSYS window, in the CAD Parameters section of the properties panel.
When you change the values of a driving dimension, you can send the changes back to Discovery SpaceClaim.
Change the values of the following CAD parameters:
round from 1 to 2
hole radius from 1.4 to 1
length from 35 to 38
In ANSYS 11, change the values directly in the properties panel.
In ANSYS 12, click each parameter you want to drive. A letter P should appear next to each parameter. Go back to Workbench and edit the parameter values using the parameter group that appears in a new cell.
Send the changes back to Discovery SpaceClaim by clicking Update: Use Simulation Parameter Values.
This will change the model in ANSYS and in Discovery SpaceClaim.
|
Before: |
After: |
|
|
Also notice that when you click on the groups in the Groups panel, you see the dimensions specified in ANSYS.
You can also use annotation dimensions to drive changes in ANSYS.
In Discovery SpaceClaim, click the box next to the annotation plane so it is visible.
Click Move in the Edit group on the Design tab.
Select Inner_tube_pushed_in_position in the Structure tree.
Click the red axis of the move handle:

You must select an axis on the Move handle before you can use the dimensions to drive changes. Clicking a handle tells the Move tool which direction the change will be made. The sparks appear only after an axis is selected.
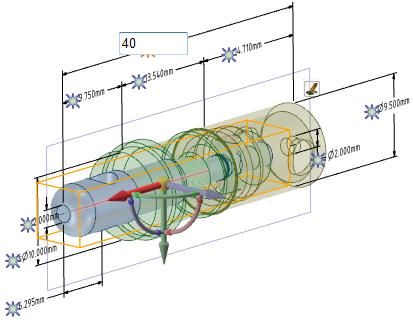
Click the spark next to the 38mm dimension and change it to 40:
Click Create Group in the Groups panel.
A new driving dimension is created from the annotation dimension and Move tool. Changing this driving dimension is like using the Move tool to change the dimension.
Go back to ANSYS and click Update: Use Geometry Parameter Value.
The model will update and the new parameter will be passed over. Now you can change the length of the model by changing the location of the part or by stretching the model.
In this tutorial, you have learned
Copyright © 2004-2017 ANSYS, Inc. All Rights Reserved. SpaceClaim is a registered trademark of ANSYS, Inc.