
| ANSYS Discovery SpaceClaim |
|
The Missing Faces tool automatically detects and fills missing faces on an object. This tool should be used to find missing faces on imported designs.
Use the Fill tool to fill faces when you know where the edges of the new face should be. Use the Missing Faces tool to identify missing faces and fill them automatically or choose which missing faces you want created.
As a precaution, if your design includes any open edge loops, first be certain that the loop(s) are not simply imported parts that may have been designed as a surface body with open regions.
Click ![]() Missing Faces in the Solidify group on the Repair tab.
Missing Faces in the Solidify group on the Repair tab.
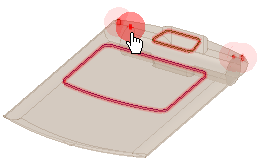
The tool will automatically detect and highlight missing faces, as shown in the image above.
Select the object(s) you want to change:
Use the Select Problem tool guide to select highlighted areas that you want to change. The cursor will change to a hand when you move the mouse over a problem area. This tool guide is active by default.
Use the Select Geometry tool guide to select edge loops that were not automatically detected.
Set the following options:
Minimum Angle: The minimum angle between all neighboring edge pairs in the potential missing face edge loop.
Minimum Distance: The minimum distance between all of edges in the potential missing face edge loop.

|
The tool looks for missing faces that meet both of the minimum measurements. |
Fill: Fix the missing face by extending neighboring faces until they intersect.
Patch: Fix the missing face by creating a new face through the bounding edges of neighboring faces. To repair edge loops, select Patch and insert a new blended face. This new face will include each relevant tangent neighboring face, enabling you to close any selected edge loops with the smoothest possible inside surface, thereby creating a more realistic design..
Try both: Fix the missing face by extending neighboring faces. If that does not work, Discovery SpaceClaim will attempt to fill by creating a patch.
Allow multiple faces: Fix a hole in the surface with two or more missing faces.
Click Next or Previous to step through and highlight each identified problem.
Select Zoom to Fit if you want to automatically zoom in on the problem in the design area when you click Next or Previous.
Click the Complete tool guide.
Discovery SpaceClaim creates a new face using the method you selected in the Options panel.
The following tool guides help step you through the process. Use the Tab key to cycle through them. As soon as the tool guide switches, the cursor may change to reflect the active guide.
|
|
The Select Problem tool guide is active by default. This tool guide allows you to select problem areas that are automatically found by the tool. |
|
|
The Select Geometry tool guide allows you to select edges between faces that were not automatically found. Hold Ctrl to select multiple edges or box select in the design area. |

|
The Exclude Problem tool guide allows you to exclude areas from selection and fixing. |
|
|
The Complete tool guide creates new faces in areas that are highlighted. |
The following options are available in the Options panel:
|
Minimum angle |
The minimum angle between all neighboring edge pairs in the potential missing face edge loop. |
|
Minimum distance |
The minimum distance between all of edges in the potential missing face edge loop. |
|
Fill |
Fix the missing face by extending neighboring faces until they intersect. |
|
Patch |
Fix the missing face by creating a new face through the bounding edges of neighboring faces. Faces with a high level of detail on a boundary may have one or more short edges. To make a smooth patch on a boundary, short edges are automatically removed when patching. |
|
Try both |
Fix the missing face by extending neighboring faces. If that does not work, Discovery SpaceClaim will attempt to fill by creating a patch. |
|
Allow multiple faces |
Fix a hole in the surface with two or more missing faces. |
Copyright © 2004-2017 ANSYS, Inc. All Rights Reserved. SpaceClaim is a registered trademark of ANSYS, Inc.


