
| ANSYS Discovery SpaceClaim |
|
The Split Body tool works in two modes:
"Slow mode" is activated by clicking a Split Body tool guide. In this mode, once a tool guide is clicked, it remains selected until another tool guide is clicked. This mode works just like any other tool.
"Fast mode" automatically activates tool guides and moves you through the workflow. This predictive mode allows you to box-select multiple cutters to add even more efficiency.
You can use the Split Body tool to:
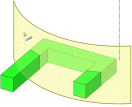
Split a body by its edges
Split a body by its faces
Split a body by a plane
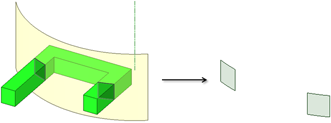
You can select a body or surface from the Structure tree as the target and a plane from the Structure tree as the cutter.
Click the Split Body tool ![]() from the Intersect ribbon group.
from the Intersect ribbon group.
Select the faces or edges you want to use to cut the body.
Hold Ctrl and click or draw a box to select multiple faces or edges.
You can create temporary geometry and select it to cut the body.
Mouse over the body to see the regions created by the cut.
(Optional) Click a region to delete it.
When you are finished deleting regions, select another tool.
If the selected edges do not completely encircle a portion of a body or surface, no region selection can occur.

|
Select a face with the Select tool, then select the Split Body tool to cut the body with the face. |
Click the Split Body tool in the Intersect group on the Design tab
Select the body
Check ON the Local Slicing option
Click the cutter plane; you will see a blue outline which previews local slicing locations for splitting the body
Click on a blue outline preview to cut the body; the Select Regions tool guide is then activated however, holding the Ctrl key or clicking the Select Cuts tool guide allows you to create additional cuts
Click a region to delete it
If you need to make multiple cuts on the same target body, manually click the Select Cuts tool guide to make it sticky before step 5.

A cylindrical surface can also be used for Local Slicing.
Use the Create Split Surfaces option to create surfaces at the intersection of the target and cutter.
The following tool guides help step you through the process. Use the Tab key to cycle through them. As soon as the tool guide switches, the cursor may change to reflect the active guide.

|
The Select Target tool guide is active by default. When this tool guide is active, click to select the body to split. |
|
|
The Select Cutter tool guide is active by default. When this tool guide is active, click to select the face you want to use to cut the body. |
|
|
The Select Cuts tool guide activates when the Local Slicing option is selected. Possible cuts are highlighted where the plane intersects the body. Mouse over the cuts to highlight them for selection. |
|
|
The Select Regions tool guide activates once you once the body is cut by the face. When this tool guide is active, mouse over the target to see the regions created by the cut. The regions you can delete are highlighted in red. |
The following options are available in the Split Body tool. Once you select the edge or face to pull, select these options from the Options docking panel, or right-click and select them from the mini-toolbar:
|
Merge when done |
Select this option to merge all touching bodies or surfaces when you exit the Split Body tool. Hidden objects are not merged. |
|
Extend faces |
Extends the selected cutter face to cut through the target body. |
|
Local Slicing |
Select this option with the Select Cuts tool guide to choose specific cuts made by a plane passing through the entire body, including those with a cylindrical surface. To Create split surfaces |
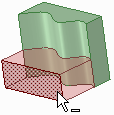
Body split by a spline face
Copyright © 2004-2017 ANSYS, Inc. All Rights Reserved. SpaceClaim is a registered trademark of ANSYS, Inc.


