
| SpaceClaim Online Help |
|
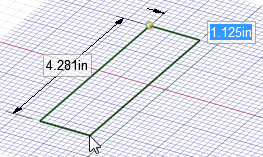
Sketch a rectangle that will become the bottom piece of the bracket.
Click the Rectangle tool ![]() in the Sketch ribbon group on the Design
in the Sketch ribbon group on the Design tab.
tab.
The grid indicates that you are in Sketch mode.
Note that pressing the K key is a shortcut for quickly returning to Sketch mode.
Click to set the first corner of the rectangle. (Start at the upper left.)
As you move your mouse, a preview of the rectangle is drawn, and dimension fields appear.
Type 1.125, then press Tab and dimension the second side by typing 4.281.
Press Enter to complete the rectangle.
Note: If you make a mistake, click a dimension to edit it, or click the Select tool ![]() in the Edit ribbon group and double-click the rectangle to select it. Then press Delete< to delete the rectangle and redraw it. You can also use Ctrl+Z and Ctrl+Y to undo and redo steps.
in the Edit ribbon group and double-click the rectangle to select it. Then press Delete< to delete the rectangle and redraw it. You can also use Ctrl+Z and Ctrl+Y to undo and redo steps.
Pull the rectangle into 3D to create the bottom of the bracket.
Switch to 3D mode by clicking the 3D mode tool ![]() in the Mode ribbon group.
in the Mode ribbon group.
You can also use the D key to quickly enter 3D mode.
The Pull tool ![]() in the Edit ribbon group is activated, your sketched rectangle now appears as a rectangular surface, and the surface appears in the Structure tree.
in the Edit ribbon group is activated, your sketched rectangle now appears as a rectangular surface, and the surface appears in the Structure tree.
Click on the rectangular surface to select it.
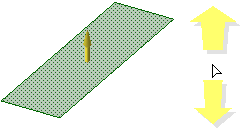
The faint yellow cursor arrows show you the directions in which you can pull the rectangle.
Drag to begin adding thickness to the rectangle.
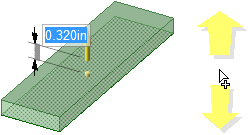
You can drag with your cursor anywhere in the Design window—you do not have to drag on the Pull arrow itself. We recommend that you move your mouse off to the side when pulling to make it easier to see your changes.
Type .483 and press Enter.
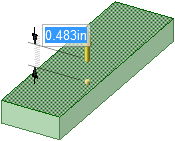
The surface in the Structure tree becomes a solid. (Pulling a curve creates a surface, while pulling a surface creates a solid.)
Press Ctrl+S or select Save from the File menu ![]() to save your design.
to save your design.
| « Previous step | Next step » |
© Copyright 2015 SpaceClaim Corporation. All rights reserved.