| DesignSpark Mechanical Online Help |
|
Use the ![]() Replace tool in the Edit ribbon group on the Design
Replace tool in the Edit ribbon group on the Design tab to replace one face with another. You can replace multiple faces with a single face, replace a single face with multiple faces, or replace multiple faces with multiple other faces.
The Replace tool also lets you manually simplify or align complex faces and curves into planes, cones, and cylinders. (If you want to automate this process, use theSimplifytool in the Adjust group on the Repair tab to automatically find problem areas.)
Click the ![]() Replace tool in the Edit ribbon group on the Design tab.
Replace tool in the Edit ribbon group on the Design tab.
Select the face you want to replace (that is, the target
Select the face, surface, or plane you want to use to replace the target face (that is, the source
You can select sources in the Design window or in the Structure tree.
Click the target face and Alt+click the source face, surface, or plane with the Select tool.
Click the Replace tool to replace the target face with the source face.
Click the Replace tool.
Click the Target tool guide to make it sticky, then click each target face.
Youcan also use any multiple-face selection method.
Select the source face, surface, or plane.>
You can select a source in the Design window or in the Structure tree.
Click the Replace tool.
Select the target face.
Click the Source tool guide to make it sticky, then click each source face, surface, or plane.
You can select sources in the Design window or in the Structure tree and can also use any multiple-face selection method.
Click the Complete tool guide or press Enter to replace the target.
Click the Replace tool.
Click the Target tool guide, then click each target face.
Youcan also use any multiple-face selection method.
Click the Source tool guide twice to make it sticky, then click each source face, surface, or plane.
You can select sources in the Design window or in the Structure tree and can also use any multiple-face selection method.
Click the Complete tool guide or press Enter to replace the targets.
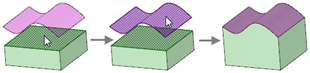
Replacing a target split face with a source surface
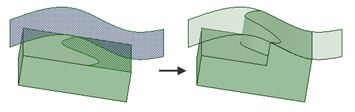
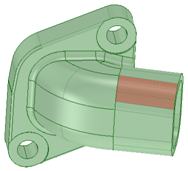
Replacing multiple target faces (the protrusion) with a single source face (the surface)
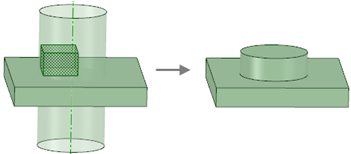
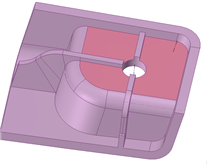
Replacing multiple target faces (in the depression) with multiple source faces (on the surface)

Click the Replace tool.
Click the Target tool guide, then click each face that you want to align or simplify.
You can also use any multiple-face selection method.
If the selected faces are candidates for alignment or simplification, they are highlighted in red. Faces can be aligned or simplified by the Replace tool if they are within DS Mechanical ’s alignment or simplification tolerance of ±0.0001m.
Click the Replace tool.
Ctrl+click each curve that you want to simplify.
If the selected curves are candidates for alignment or simplification, they are highlighted in red.
Click the Complete tool guide or press the Enter key to align or simplify the highlighted curves.
Almost-planar faces highlighted for alignment
Faces highlighted for simplification
|
|
Select target faces using the sticky Target |
|
|
Select source faces, surfaces, or planes using the sticky Source tool guide. |
|
|
Click the Complete tool guide to replace the target face with the source face, or to simplify or align the target face. |
© Copyright 2014 Allied Electronics, Inc. All rights reserved.


