


 Hide All
Use the Split Face tool to create an edge on a face or surface by splitting it with another face or edge. You can use the new edge to modify the face independent of previously attached geometry.

To create an edge on a face
-
Click
 Split Face in the Intersect group on the Design tab.
The Select Target tool guide is enabled.
-
Select the face you want to split.
-
(Optional) Select a tool guide.
Mouse over faces or edges in your design to preview the edge that will be created on the target. Dimensions are displayed along the U and V edge of the face.
-
Click to select the face, plane, or edge you want to use to split the selected face. You can select multiple faces.
You can hold Shift and hover over an edge while selecting the cutter points. The midpoint on the edge will be marked with a yellow ball in parentheses. The x and y dimensions will emanate from that point.
-
The Select Results tool guide remains active until there is only one split line remaining, so you can remove all but one split line without reactivating the tool guide
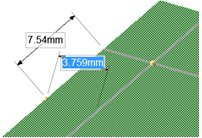
Dimensioning from the midpoint of an edge to split a face.
 To split a face with another face or plane
-
Click the Select Cutter Face tool guide.
-
Mouse over the faces and planes in your design to preview the edge that will be created on the target.
-
Click the face or plane to split the selected face with an edge.
To split a face using a point on an edge
-
Click the Select UV Cutter Point tool guide.
-
Mouse over the edges of the face to preview the edges that will be created.
-
Click a point on the edge to split the selected face. The percent distance along the edge is displayed.
To split a face using two points
-
Click the Select Two Cutter Points tool guide.
-
Click a point on an edge.
-
Mouse over the face or edges to preview the edges that will be created.
-
Click a point on another edge or on the face to split the selected face.
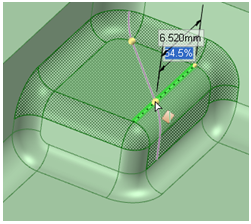
Previewing edges that can be created using the Select Cutter Point and Select Two Cutter Points tool guides
Splitting a face in section mode by selecting points on a section line
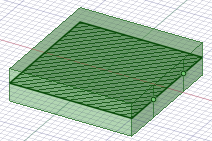
Splitting multiple faces with the Select Two Cutter Points tool guide
To split a face using a perpendicular line from a point on an edge
-
Click the Select Perpendicular Cutter Point tool guide.
-
Click a point on an edge.
-
Mouse over edges of the face to preview the edges that will be created.
-
The distance and percentage along the edge is displayed. You can Press the Space bar and Tab key to change these values.
-
Click
Split Face in the Intersect group on the Design tab. -
Click the Select Target tool guide.
-
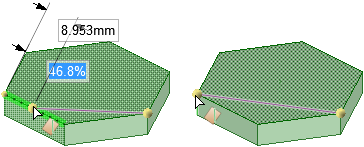
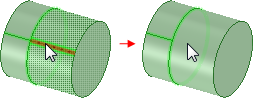
Select the periodic face you want to split.
-
Click on the point of the face where you want it split, as shown below.

-
The Select Results tool guide is now active, so you can click edges that you don't want to keep, as shown on the left of the image below. The result after the two straight edges have been removed is shown on the right.
Tool guides
Within the Split Face tool, there are several tool guides that help step you through the splitting process:
|
|
The Select Target tool guide is active by default. If you did not pre-select the target face or surface, you can select it from within the Split Face tool using the Select tool guide. Ctrl+click multiple surfaces or solid faces in the same plane to split them all. |
|
|
The Select Cutter Face tool guide activates once you select a target. When this tool guide is active, click to select the face or surface you want to use to create an edge on the target. |
|
|
The Select UV Cutter Point tool guide activates once you select a target. Mouse over an edge to preview the new edges that will be created. Click to create the edge on the selected face. You can mouse over an edge with this tool guide to display and edit the length along the edge, and the percentage of the edge that is between the first point and the end point. |
|
|
The Select Perpendicular Cutter Point tool guide activates once you select a target. Select an edge to preview where the perpendicular split will be made. Click to create the edge on the selected face. The face is split perpendicular to the edge you select. |
|
|
The Select Two Cutter Points tool guide activates once you select a target. Click to select the first point on an edge, then mouse over another edge to preview the new edge that will be created. Click to create the edge on the selected face. The shortest line is drawn between the two points. You can mouse over an edge with this tool guide to display and edit the length along the edge, and the percentage of the edge that is between the first point and the end point. |
|
|
Select the Select Results tool guide, then click newly created edges to remove any edges you don't want to keep. |


Options
The following option is available in the Split Face tool:
|
Make Curves |
Select this option to create sketch lines instead of splitting the face. |