


You can drag a spline, its spline points, or its control points while the Select tools is active. You can be in 2D or 3D mode.
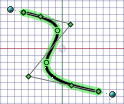
Spline points are the points along the spine that define the position of its curves. Spline points are displayed as circles when you hover over a spline.
Control points are displayed outside of the spline, and define the curvature of the spline between points. Control points are displayed as diamonds connected by a dotted line when you select a spline.
To move a spline
-
Click the Select tool in the Edit group on the Design tab while in 2D mode.
-
Mouse over the spline to highlight the spline and display its defining points.
-
Click anywhere on the spline except for the defining points, and drag it to move it.
To edit a spline
-
Click the Select tool in the Edit ribbon group while in 2D mode.
-
Mouse over the spline to highlight the spline and display its defining points.
-
Click and drag on any spline or control point to move it, leaving the other spline and control points fixed in space.
You can box-select spline points.
-
(Optional) Edit the dimensions associated with that point.
To change spline end points
-
Select the spline to display its end point control handle.
The end point control handle is a light blue point at the end of a dotted line extending outwards from the end of the spline. In some cases, these end points may be located some distance away from your sketch. Zoom out from the sketch until you can see the end point control handle.
If another line, arc, or spline shares that end point, the end point influence may snap into tangency with that sketch entity. To adjust the end point influence in this case, move the mouse a short distance away from the end point to display the end point control handle.
After it is moved, the end point will snap to its original tangency.
-
(Optional) In 3D, hold Alt and select a planar or linear object that you want the spline to be tangent with. You can hold Alt and select a curve, edge or face if the curve, edge or face passes through the point. If you select a face, the tangency at the point where the point intersects the curve or surface is used. The default is the tangency direction with the least amount of curvature.
-
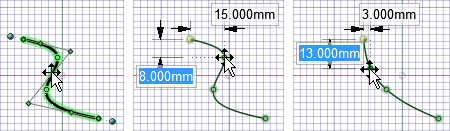
Drag the end point control handles to change the influence of that end point on the shape of the spline.
The control handle will snap back to its initial tangent direction, which is indicated by a dotted line.
The amount of the end point's influence can be controlled by dragging the end point control handle closer to or further away from the end point.
To add spline points
-
Click the Select tool in the Edit group on the Design tab while in 2D mode.
-
Mouse over the spline to highlight the spline and display its defining points.
-
Right-click anywhere on the spline except on the defining points, and select Add Knot to create another spline point at that location.
To remove spline points
-
Click the Select tool in the Edit group on the Design tab while in 2D mode.
-
Click the spline to highlight it and display its defining points.
-
Right-click the point you want to remove and select Remove Spline Point.
The spline adjusts to accommodate the removal of the point.
To change the end point tangency of a spline
-
Click the Select tool in the Edit group on the Design tab while in 2D mode.
-
Select the spline in the Design window.
-
Set the value for Periodic in the Properties panel:
-
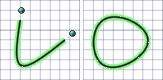
True: If you change this property to True, the tangencies of the beginning and end of the spline curve will match to create a closed curve. If a spline curve is open and you set the property to True, the spline will be closed, as shown here:
-
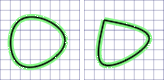
False: If you change this property to False, the end tangencies of a closed curve don’t match. If a spline curve is closed and you set the property to False, the curve will become teardrop-shaped because the end points will no longer be tangent, as shown here:
-
To extend a spline by pulling
-
Click the Pull tool in the Edit group on the Design tab while in 3D mode.
-
Click an end point of the spline and drag in the direction of the Pull arrow.
You can also click the end point, click the Up To tool guide, then click the object up to which you want to pull.
Examples
Dragging a spline point
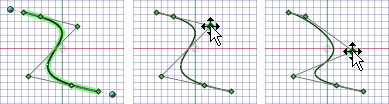
Dragging a control point
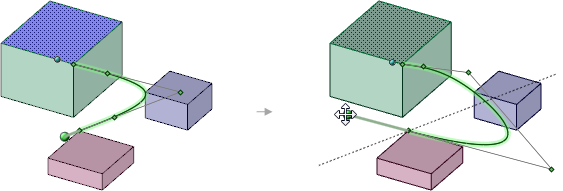
Dragging end point control handles in 3D