


 Hide All
The Properties panel is on the left side of the DesignSpark Mechanical interface, below the Structure tree and Options panel. When you select a complete component, surface, or solid by triple-clicking it in the Design window or selecting it in the Structure tree, you will see its properties in the Properties panel. You can use the Properties panel to modify various properties values, such as Color to set the color of a selected face or body, or to change other properties values.
In addition to components, surfaces, and solids, you can modify property values for sketched objects, inserted images, patterns, and sheet metal. The property settings for these objects are described in detail in their specific topics.
It may be helpful to configure the Properties panel so that you can see object properties and the Structure panel simultaneously.
To modify an object's properties
-
Select an object in the Structure tree or right-click the object in the Design window and select Properties.
-
Edit the property values.
To modify document properties
-
Select the top-level design or a component in the Structure tree.
You can hold Ctrl and select more than one component.
-
In the Properties panel, expand Document properties to display information such as the date and time of creation and modification.
-
Enter additional information such as Creator, Description, Title, and Version.
These properties can be included in BOM tables.
-
In the Name section of the Properties panel, select Use File Name if you want to display the file name for the top level design component in the Structure tree.
To create a custom document property
-
Select the top-level design or a component in the Structure tree. You can select more than one component.
-
Right-click in the Properties panel and select Add Document Property to create a custom property.
-
Expand the property to display its value.
-
Enter a name for the property, select its type (date, Boolean, number, or string), and enter its value.
Delete a custom property by right-clicking the property in the Properties panel and selecting Delete Document Property.
To create a custom component property
-
Select a component in the Structure tree.
-
Right-click in the Properties panel and select Add Component Property to create a custom property.
-
Expand the property to display its value.
-
Enter a name for the property, select its type (date, Boolean, number, or string), and enter its value.
Custom component properties can be used in BOMs and note fields. Delete a custom property by right-clicking the property in the Properties panel and selecting Delete Component Property.
Material properties
You can set the gage for a material used in a sheet metal part. Assigning a gage enables you to control the thickness of a sheet metal part at a more granular level.Gage, or, ‘gauge’, is the thickness of the metal organized by numbers: the smaller the number the thinner the metal. A sheet metal design or component of a design must be assigned a material in order for the gage drop down to display. You cannot select a gage for designs or components that are assigned the ‘Unknown Material’ option.
To assign a material, from the Structure tree select the design at the top level, or select the component for which you want to assign a material, and then click the Material Name dropdown from the Material group in the Properties panel. From the Thickness group in the Properties panel, click the gage drop down, and select a gage.
You can specify material properties for a component in several ways:
 Select a material from the Materials Library
-
Select a component in the Structure tree.
-
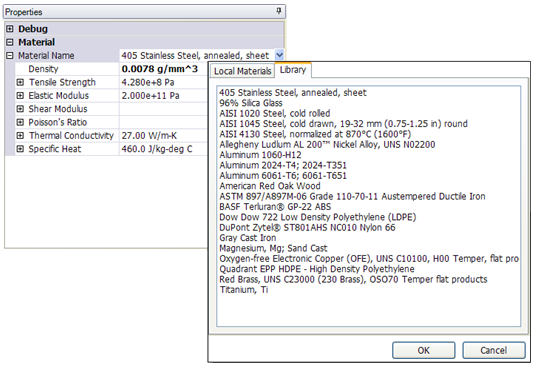
In the Properties pane, expand Material properties.
-
Click
 in the Material Name field to display the Materials Library.
 -
Select the Library tab.
-
Select a material and click OK.
The material and its properties are displayed and can be edited in the Properties panel. The material also appears in the Local Materials tab and saves with the SCDOC file. You can download materials from Resources in DesignSpark Mechanical options.
Select a Material from the local library
-
Select a component in the Structure tree.
-
In the Properties pane, expand Material properties.
-
Click
in the Material Name field to display the Materials Library. -
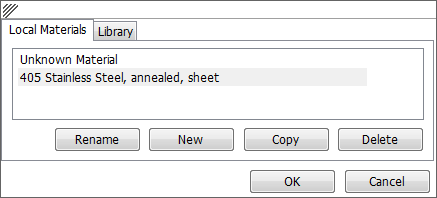
Select the Local Materials tab.
-
Select a material and click OK.
The material and its properties are displayed and can be edited in the Properties panel. The material also saves with the SCDOC file.
You can rename, copy, and delete Materials from the Local Library. You can also create new Materials.
-
Select a component in the Structure tree.
-
In the Properties pane, expand Material properties.
-
Enter the name of the material in the Material Name property.
-
Enter the density of the material in the Density property.
If you specified the density for the material elsewhere in the design, or specified it in the same DesignSpark Mechanical session, DesignSpark Mechanical displays that value in the Density property for you.
-
(Optional) Expand other material properties and enter their value and units.
The material and its properties appear in the Local Materials tab and save with the SCDOC file.
To remove a material from a component, select Unknown Material from the Local Library.
You can only change the Density value for material properties. All other values are determined by the material you select.
Recognizing rounds and chamfers
Rounds and chamfers created in DesignSpark Mechanical are automatically recognized, but they may not be recognized on imported models.
-
Select a round or chamfer face.
-
Change the Round or Chamfer property to True.
Drawing sheet properties
You can modify properties of the drawing sheet views and other aspects of drawing sheets such as annotations, BOM, tables, and threads in the Properties panel.