
| SpaceClaim Online Help |
|
Use the ![]() Mirror
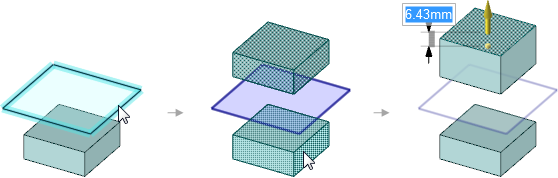
Mirror tool in the Insert ribbon group on the Design tab to mirror any geometry that can be moved with the Move tool. You can insert a mirror plane between two faces, associating the faces so you can edit them together. You can copy a solid, surface, face, or curve from one side of a mirror plane to the other.
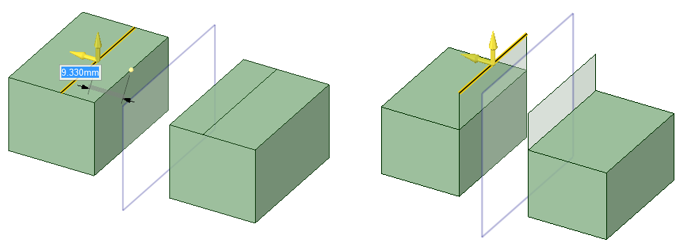
You can mirror curves, points, and axes without leaving sketch mode or cross section mode. When you mirror a curve, changing its geometry does not propagate to the other side.
You can mirror solids that contain patterns of features on a face, and the pattern will be updated on both sides. The pattern must be created before the solid is mirrored.
The plane becomes a persistent mirror once you create geometry using the mirror. The mirror relationship is maintained when you use other 2D and 3D tools to edit your design.
Mirrored components have a mirrored icon in the Structure Tree and maintain their mirror relationships when they are exported.
Mirrored objects are created on the same layer as the original object. Mirrored points do not maintain their mirror relationship.
(Optional) Create the plane you want to use as a mirror using the Insert Plane tool and position it with the Move tool.
Click Mirror ![]() in the Create group.
in the Create group.
The Select Mirror Plane tool guide is enabled.
Click the plane to use as a mirror.
Mouse over the solids or faces in your design to preview the solid, surface, or face that will be created on the other side of the selected mirror plane.
Click the object you want to mirror.
The mirror plane is created and will persist in other tools.
You can click objects in your design or click a component in the Structure tree.
If you enclose a volume by mirroring faces, a solid is created.
Click Mirror ![]() in the Create group.
in the Create group.
The Select Mirror Plane tool guide is enabled.
Click the Remove Mirror tool guide.
Click the face from which you want to remove the mirror relationship. You can also Box-select any number of faces.
You can temporarily disable a plane in any tool. Select a mirrored face to display the mirror plane, then click the mirror icon to disable the mirror. Click the mirror icon again to enable the mirror.
Merge mirrored objects: When you use a face as the mirror plane, or when the mirror plane lies on a face of the source object, the two mirrored objects will be merged. Deselect this option to make a new object, as shown below.

Create mirror relationships: If you deselect this option, only the geometry is created and not the mirror relationship. Changes to either object will not be reflected in the other, as shown below.
You can create a mirror plane between two symmetrical faces in your design.
Click the Mirror tool ![]() in the Create ribbon group.
in the Create ribbon group.
Click the Setup Mirror tool guide.
As you mouse over the faces in your design, the eligible faces are highlighted. A face is eligible if it is symmetrical to another face in your design.
Click a face.
Click a parallel face.
The second face is highlighted in blue and the mirror plane appears halfway between the two faces. Edits to one face will now be mirrored on the other face. Geometry in between the two faces will be updated accordingly.
You can create mirror relationships by finding similar faces on the other side of an existing mirror.
Click the Setup Mirror tool guide.
Click a face.
Ctrl+click to select multiple faces.
Alt+click a mirror plane.
Identical faces equidistant from the mirror plane are highlighted in blue, and a mirror relationship is created.
The following tool guides help step you through the process. Use the Tab key to cycle through them. As soon as the tool guide switches, the cursor may change to reflect the active guide.
|
|
The Mirror Plane tool guide is active by default. Select a face or plane to use it as a mirror. (You can also use this tool guide to select another mirror plane to use if one is already selected. |
|
|
The Mirror Body tool guide activates automatically once you select a mirror face or plane. Mouse over the solids in your design to preview the solid that will be created by the mirror. Click a solid to mirror it. |
|
|
Once you select a face or plane to use as a mirror, use the Mirror Face tool guide to select the faces you want to mirror. Mousing over the faces before you click them previews the face that will be created by the mirror. Click a face to mirror it. |
|
|
The Setup Mirror tool guide can be used any time to create a mirror plane between two faces. Only those two faces will be affected by the mirror. To create a relationship among many faces, Ctrl+select faces and then select a mirror plane to auto-detect identical faces equidistant from the mirror plane. |
|
|
Use the Remove Mirror tool to remove the mirror relationship between faces. You can select to faces with a mirror relationship, or use box-selection to select any number of mirrored pairs. |
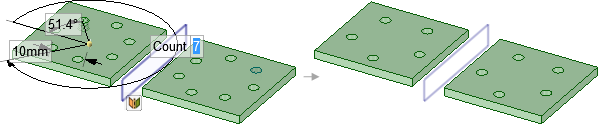
A mirrored solid with a pattern of features is updated when the count is changed from 7 to 5 on one side.

Mirroring a sketched circle. Modifying the circle does not change the geometry of the mirrored circle.
Mirror associations are maintained in the Pull tool using the Copy Edge and Extrude Edge options. The behavior for Copy Edge is on the left and Extrude Edge is on the right.
© Copyright 2016 SpaceClaim Corporation. All rights reserved.


