
| SpaceClaim Online Help |
|
Download the knob model.
Insert the knob component.
Click Home to orient your bracket.
Click the Insert tool ![]() in the Insert ribbon group to display the Open Design window
in the Insert ribbon group to display the Open Design window .
.
Navigate to and select TutorialKnob.scdoc and click Open.
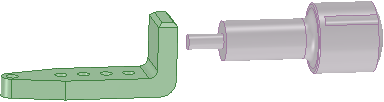
The knob appears in the Design window inside the outline of an orange box with the Move tool active to move it to a better position.
Move the knob so its small end is pointing at the back of the bracket.
Drag on one of the Move handle arrows (vectors) to separate the solids and make them easier to work with.
Drag on the curved Move handle arrows (vectors) to approximately point the small end of the handle towards the back of the bracket.
Create and activate a component for the bracket.
In the Structure panel, right-click the bracket (named Solid) select Move to New Component.
A new component, Component1, appears in the structure tree and it contains the bracket solid.
Its name is highlighted so you can rename it immediately after it is created.
Rename the new component to Bracket.
In the Structure panel, right-click Design1 and select Activate Component.
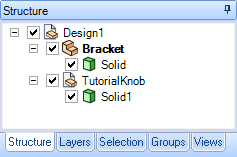
The active component is displayed in bold in the Structure panel.
Activating components allows you to select whether you are operating in the contact of the assembly, sub-assembly, or part.
Save your work.
| « Previous | Next » |
© Copyright 2016 SpaceClaim Corporation. All rights reserved.