
| SpaceClaim Online Help |
|
Sketch a dimensioned point on the top face of the long arm of the bracket, as shown in the figure.
Click the Select tool ![]() in the Edit ribbon group and select the top face of the bottom piece of the bracket.
in the Edit ribbon group and select the top face of the bottom piece of the bracket.
Note that pressing the Esc key several times returns you to the Select tool.
Click the Point tool  in the Sketch ribbon group.
You are now in Sketch mode. The sketch grid appears and the Sketch mode tool ![]() is active in the Mode ribbon group. Because you entered Sketch mode with a face selected, SpaceClaim assumes you want to sketch on that face, and orients the sketch grid along that face.
is active in the Mode ribbon group. Because you entered Sketch mode with a face selected, SpaceClaim assumes you want to sketch on that face, and orients the sketch grid along that face.
Click  Plan View in the Orient ribbon or the mini-toolbar to view the sketch grid head-on.
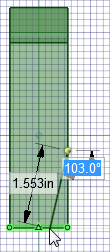
Place the cursor over the bottom right vertex of the face (as shown below) and press and release Shift, then move your mouse toward the back of the bracket along the right edge without pressing any mouse button. A dimension field appears.

This method (often called "Shift+touch" dimensioning) allows any object in any tool to dimension from that referenced object.
Press and release the spacebar to dimension the point’s distance from the vertex (1.5" along the edge).
Press Tab if you need to switch dimension fields.
Press Enter to create the point.
If the point was created at the wrong place, you can press Ctrl+Z or click  in the Quick Access toolbar (on the left side of the SpaceClaim title bar) to try again.
Draw an angled line.
Click the Line tool ![]() in the Sketch ribbon group.
in the Sketch ribbon group.
You can use the L key as a shortcut to the Line tool.
Click the point you created in the previous step (a small green ball appears when the cursor is over the point) and then move the cursor to create a line similar to the image (edges will highlight when the cursor is over them to indicate coincidence).
Two dimensions appear, one for the line's length and one for the angle formed between the sketch grid and the line.
Press and release the spacebar to dimension the line. Using the Tab key, switch to the angle dimension and type 103 to change the angle of the line.
Press the Esc key to end line creation.
You can also right-click and select Finish Line.
Remove material from the bracket.
Go to Home view and press P to enter the Pull tool.
You are now back in 3D mode. The 3D mode tool ![]() is active in the Mode ribbon group.
is active in the Mode ribbon group.
Click the triangular region created by the line and the edge of the bracket.
Note that the line effectively splits the original surface into two surfaces.
Drag downward until all the material is removed.
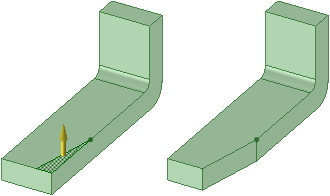
Note that as you pull, the Pull tool assumes that you want to remove material, and the cursor changes to  indicate that the pull is subtractive. If you pull in the opposite direction, material will be added.
Save your work.
| « Previous | Next » |
© Copyright 2016 SpaceClaim Corporation. All rights reserved.