


You can chamfer the edges of any solid by selecting the Pull tool's Chamfer option. Sketched chamfers that you make using the Create Rounded Corner tool with the Chamfer option are recognized as chamfers when they are extruded into a solid.
Chamfers are recognized as a face type, with their own options in the Properties panel. You can change the Chamfer (true or false) and Distance values.
After you create the chamfer, you can adjust the setback distance of both sides and you can change its offset. Drag the arrows above or below the chamfer to change the distance, or drag the arrow that is perpendicular to the chamfer to change its offset. You can also pivot the edges and the chamfer's distance properties will be updated with the new values.
 |
When you make a hole in a chamfered face, the face is no longer a chamfer. You can still pull the face, or the hole, but you cannot change the chamfer to a round or dimension the chamfer. |
To chamfer an edge
-
Click
 Pull in the Edit group on the Design tab.
 -
Select the edge or edges you want to chamfer. Double-click to select a tangent chain.
-
Select the
 Chamfer option in the Options panel or from the mini-toolbar.
 -
Click and drag the edge in the direction of the Pull arrows.
Pulling the arrow that is normal to the chamfer face changes the offset distance for the whole chamfer. Pulling either of the side arrows changes the setback distance of that side. You can press Tab to move among the arrows.
To dimension the chamfer, right-click and enter a setback distance in the mini-toolbar, or press the space bar, type the setback distance, and press Enter.
To create a chamfer with the same setback distance and size as an existing chamfer, use the Up to tool guide and select an existing chamfer face. You can also select an edge with Up To to set the setback distance.
To modify a chamfered edge
-
Select a chamfered edge or a chain of chamfered edges.
-
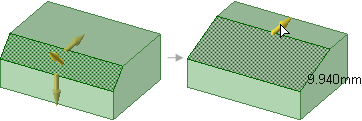
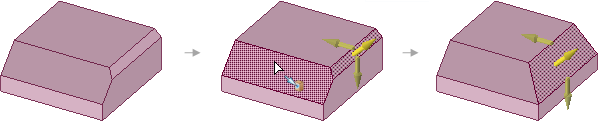
To change the setback distance of one side of the chamfer, pull the arrow above or below the chamfer, as shown below. Press the space bar while pulling to type a distance value. You can also change both setback distances in the Properties panel and in the mini-toolbar. The Up To tool guide can be used to pull the setback up to an object.
-
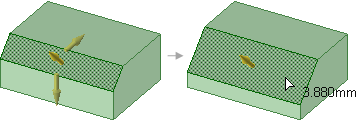
To change the offset distance of the chamfer, pull the arrow that is perpendicular to the chamfer, as shown below. Press the spacebar while pulling to type a distance value.
-
To modify by Distance and Angle, select one of the side handles to display the mini-toolbar and click the Angle
 dimension option. The selected side becomes the distance side and the other switches to angle.

-
To convert the chamfer to a normal face, select False in the Chamfer field of the Properties panel. You can select True to convert a face to a chamfer; however, faces with holes cannot be modified as chamfers. Changing this property does not change the geometry. See the instructions below to remove a chamfer from an edge.
-
|
Hold the Shift key while pulling a chamfer setback or offset to snap to existing edges. |
To convert between rounded edges and chamfered edges
-
Click
Pull in the Edit group on the Design tab. -
Select the edge or edges you want to convert to chamfers or rounded edges.
Double-click to select a tangent chain.
You can't convert a chamfered edge if you have changed the setback distance(s).
-
Select the
Chamfer option or the  Round option in the Options panel or from the mini-toolbar.
The rounded edge is converted to a chamfered edge.
|
You cannot convert a chamfer to a round if you have changed its setback distance(s). |
To make a chamfer with the same setback and offset as another chamfer
-
Click
Pull in the Edit group on the Design tab. -
Select an edge or an existing chamfer that you want to change.
-
Click the Up To tool guide.
-
Select the chamfer whose values you want to copy.
The first chamfer will be changed so its offset and setback distances are the same as the second chamfer.
To remove a chamfer with the Pull tool
This method completely removes the chamfered edge.
-
Click
Pull in the Edit group on the Design tab. -
Select the chamfered edge.
-
Select the Chamfer option
in the Options panel or from the mini-toolbar.The chamfer is removed.
To remove a chamfer with the Fill tool
This method removes the chamfered edge and creates a chamfer group in the Groups panel. You can right-click the group and select Reattach Chamfer to restore the chamfered edge.
-
Click
 Fill in the Edit group on the Design tab.
 -
Select the chamfered edge.
-
Click the Complete tool guide.
The chamfer is removed and a chamfer group is created.
Examples
Pulling to enlarge an existing chamfer while holding Shift to snap to an edge. You can only snap to an edge in this case when you pull an existing chamfer.

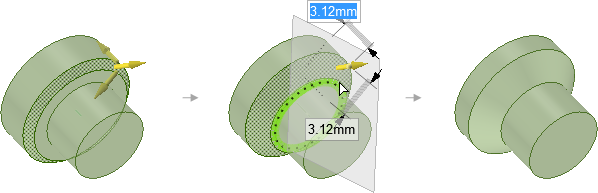
Using the Up to tool guide to change the offset and setback distances of a chamfer to match an existing chamfer.
Creating a chamfer on multiple edges at the same time.