
| SpaceClaim Online Help |
|
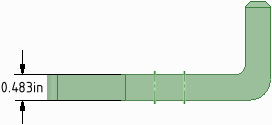
Enter the width of the bracket back.
To make this easier, zoom into the bracket components by clicking on the Design tab above the ribbon and selecting Zoom In from the Zoom menu in the Orient ribbon. If necessary, shift-drag to center the view.
Click on the Detailing tab again, and then click on the Dimension tool in the Annotation ribbon.
Click on the left edge of the wall of the bracket (bottom left of drawing) then click on its right edge. Do not use the Ctrl key.
A dimension box displays the width of the wall.
Move the mouse up (no buttons should be pressed) until the dimension box is located where you want it, then click.
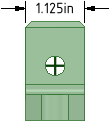
Enter the width of the bracket base.
Click on the top edge of the bracket base (bottom right of drawing) then click on its bottom edge. Do not use the Ctrl key.
A dimension box displays the width of the base.
Move the mouse over (no buttons should be pressed) until the dimension box is located where you want it, then click.
Notice the dimension is the same that you used to create the bracket.
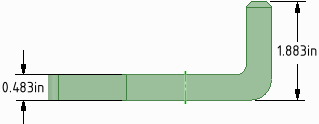
Enter the height of the bracket back.
Click on the bottom edge bracket base (bottom right of drawing) then click on the top edge of its back. Do not use the Ctrl key.
A dimension box displays the height of its back.
Click and move the mouse (no buttons should be pressed) until the dimension box is located where you want it then click again.
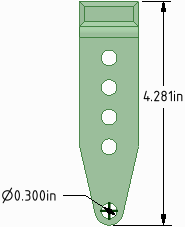
Enter dimensions for the top view of the bracket (top of drawing).
Click on the edge of the hole at the end of the bracket.
Move the mouse (no buttons should be pressed) until the diameter of the hole is located where you want it, then click. You may need to click on the arrow to move it to the edge oh the circle.
Click on the top of the back of the bracket.
Move the mouse (no buttons should be pressed) to the bottom of the rounded edge. When you move the mouse, many dimensions appear, including the tangent point of the bottom edge. Click and move the dimension until you have placed it where you want it.
Notice the dimension is 4.281, which is what you entered to create the solid.
Create a note.
Click on the Note tool in the Annotation ribbon.
Click where you want the note to be on the drawing and begin to type your note. Press Esc to exit the tool.
Click on the Note Leader tool ![]() in the Annotation ribbon.
in the Annotation ribbon.
Mouse over the note to see where you can attach the leader. Click on one of the attachment points and drag. When the leader reaches where you want it to end, release the mouse and press Esc to exit the tool.
Create a Material Finish Symbol.
Select the Material Removal Required tool from the Surface Finish list in the Annotation ribbon. Click a face in the design to place a leader, then click in an empty area to place the surface finish symbol. You can enter text or symbols.
Change the design from the drawing.
You can see the solid models in the drawing by pressing the middle mouse button and spinning the drawing.
Save your work.
| « Previous | Next » |
© Copyright 2016 SpaceClaim Corporation. All rights reserved.